
I do a lot of tool building and research in the container space for Windows. This often requires something called nested virtualization.
What is Nested Virtualization? In simple terms, nested virtualization is the ability to run a hypervisor, like Hyper-V, inside of a virtual machine (VM) that is itself running on a hypervisor. It’s essentially a VM inside a VM. This allows you to create entire virtual labs on a single host machine without needing multiple physical devices. For a deeper dive, you can read the official documentation from Microsoft here.
There are a lot of different ways to build out that kind of environment, but by far the easiest, I believe, is to utilize Windows Hyper-V Manager. It provides native nested virtualization support, detailed VM resource customization, and is just downright faster than working within VMware or VirtualBox on a Windows host. You also have the added benefit of it being native to Windows. Things just seem to work. (Don’t make me regret saying this, Microsoft  ). You will need Windows Pro to be able to use Hyper-V Manager.
This post is just about the basics of getting started. Testing environments are meant to be custom and changed to what you need. Think of this as a template for spinning up VMs that interact only where they are supposed to, creating a safe space for building and testing your tools.
Let’s get started.
The Lab Blueprint
We will create a total of 5 virtual machines (VMs) to start:
- Kali Linux: Our default attacker machine.
- Windows Server 2022: The most commonly found server OS currently in enterprise environments. This will be our Domain Controller.
- Windows Server 2025: Several key changes were made that affect some tooling, making it a valuable addition.
- Windows 10 Workstation: The most commonly found workstation OS.
- Windows 11 Workstation: The new standard for user devices going forward.
Step 1: Installing Hyper-V
First, we need to enable the Hyper-V feature in Windows. You can get to the “Turn Windows Features On or Off” dialog by hitting Win + R to open the Run box and typing optionalfeatures.exe.

In the window that appears:
- Scroll down and find the Hyper-V option.
- Click the checkbox to select it. Ensure all sub-components are also selected.
- Click OK.
- Windows will install the necessary files and then prompt you to restart. A reboot is required.
Note: If you want to install via command line, run an administrative PowerShell and use the following command:
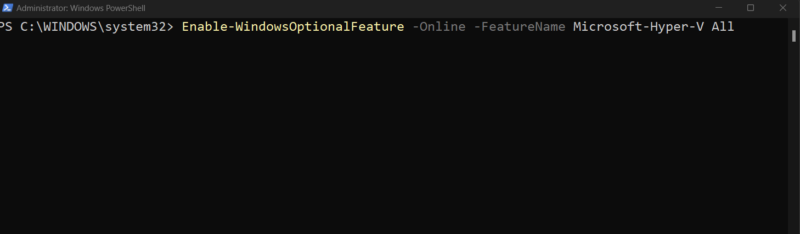
Step 2: Configuring the Virtual Networks
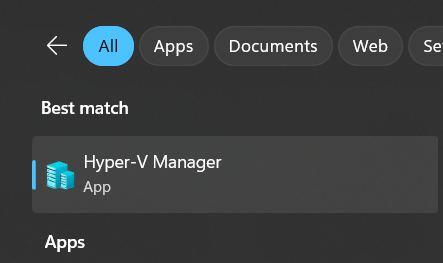
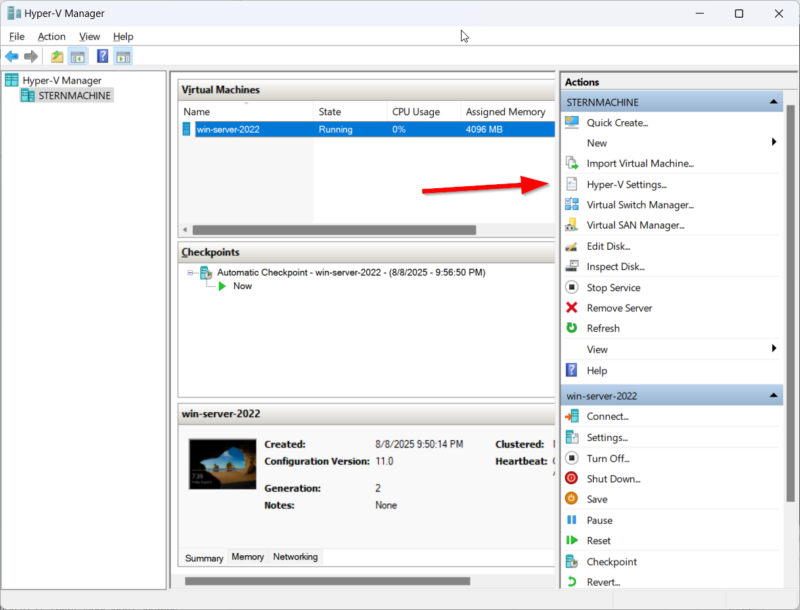
Once your machine has rebooted, open Hyper-V Manager.
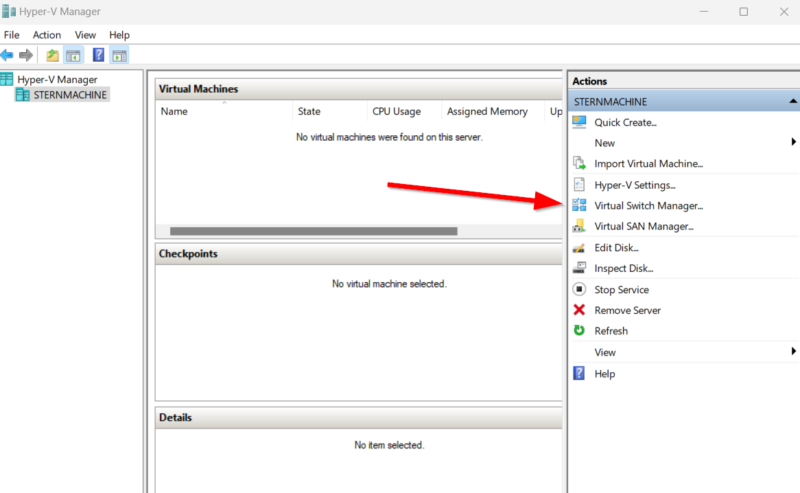
On the right-side Actions pane, click on Virtual Switch Manager…. We’ll create two switches:
- Internal Network (intnet): Create a New virtual network switch, select Internal, and name it intnet. This allows VM-to-VM and VM-to-host communication only.
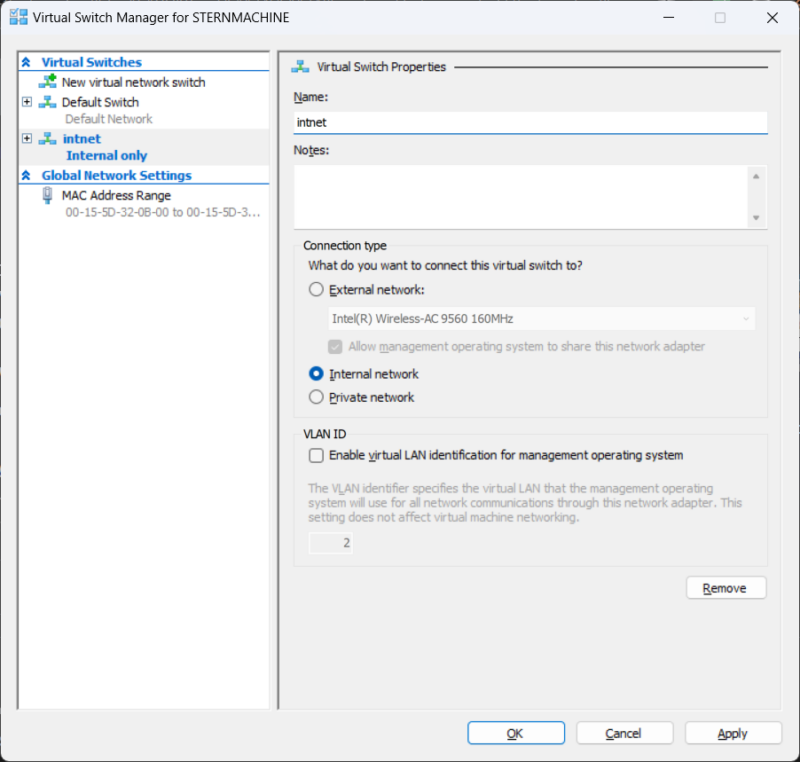
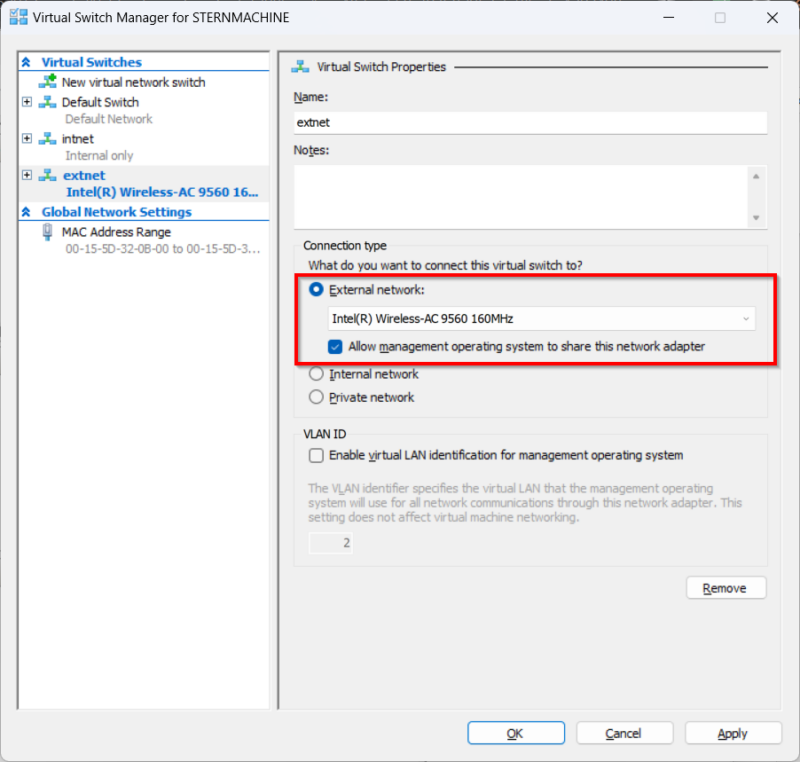
- External Network (extnet): Create another New virtual network switch, select External, and name it extnet. This creates a bridged network by linking to your host’s physical NIC (the one ipconfig /all shows with a Default Gateway), giving VMs internet access. You’ll get a warning about a temporary network disruption; this is normal.
Step 3: Creating the Windows Server 2022 VM
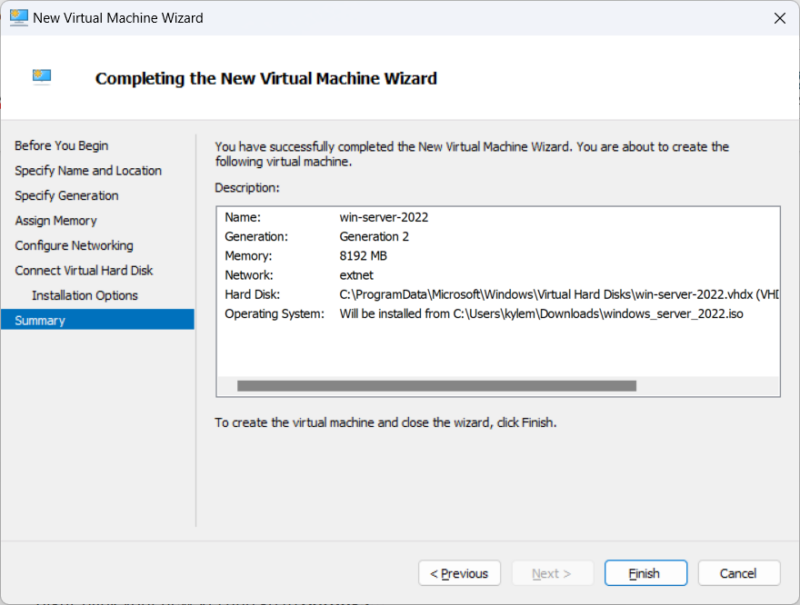
Google “Windows Server 2022 Evaluation Center” to find and download the official ISO. Then, in Hyper-V Manager, use the New > Virtual Machine… wizard:
- Name: WIN-SERVER-2022 (or similar)
- Generation: Generation 2
- Memory: 8192 MB (8 GBs), with Dynamic Memory enabled.
- Networking: Connect it to the extnet switch for now.
- Virtual Hard Disk: Create a new one. Use at least 120 GB if you plan for SCCM/MECM; otherwise, 60 GB is fine.
- Installation: Point it to the Windows Server 2022 ISO you downloaded.
Step 4: Post-Creation VM Settings
Right-click your new VM and go to Settings…:

- Add Internal Network: Go to Add Hardware > Network Adapter and connect this new adapter to the intnet switch.
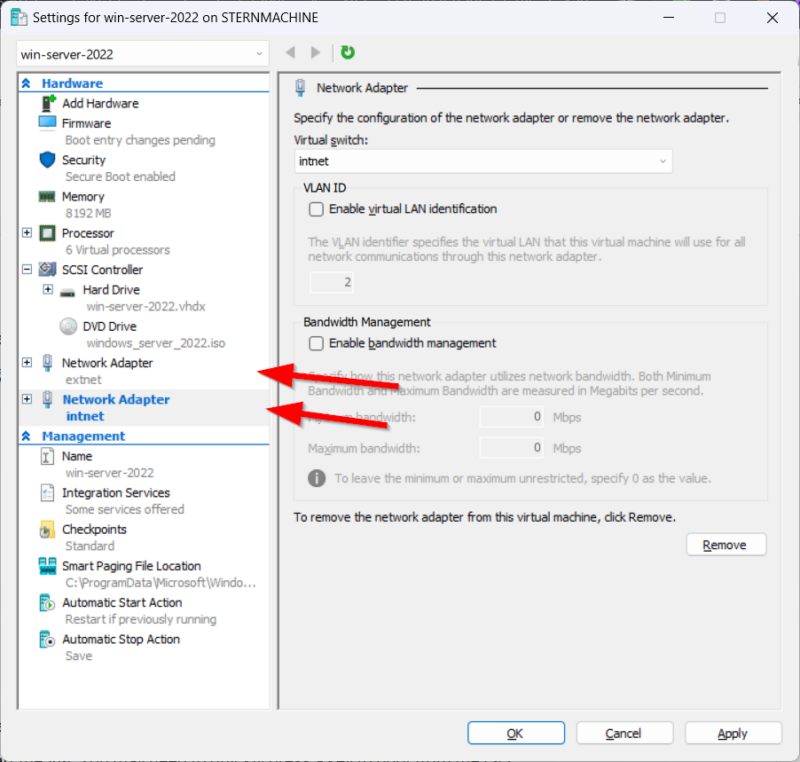
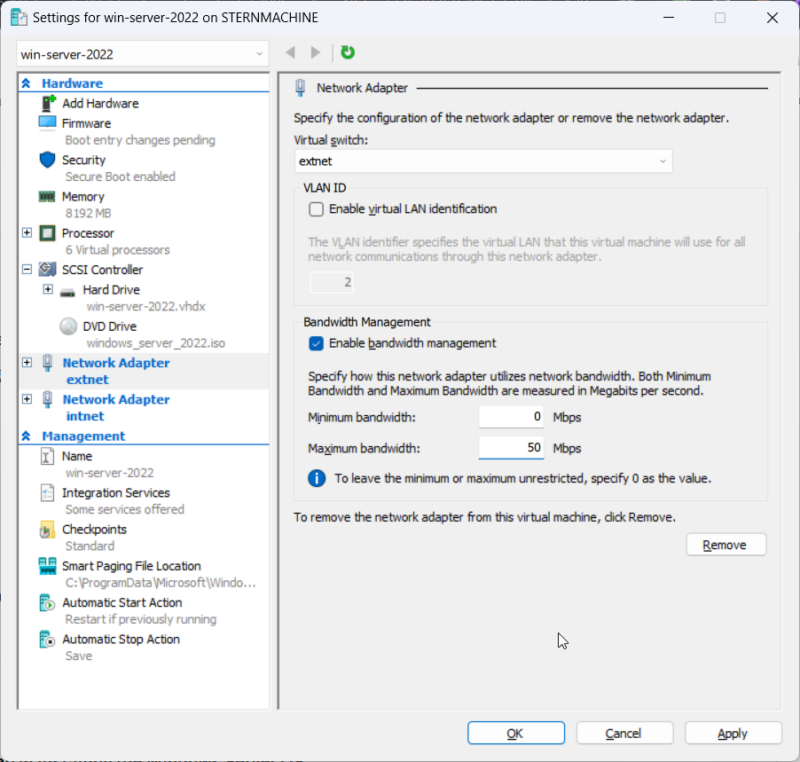
- Limit Bandwidth: On the extnet adapter’s Advanced Features, enable bandwidth management and set the maximum to 50 Mbps.
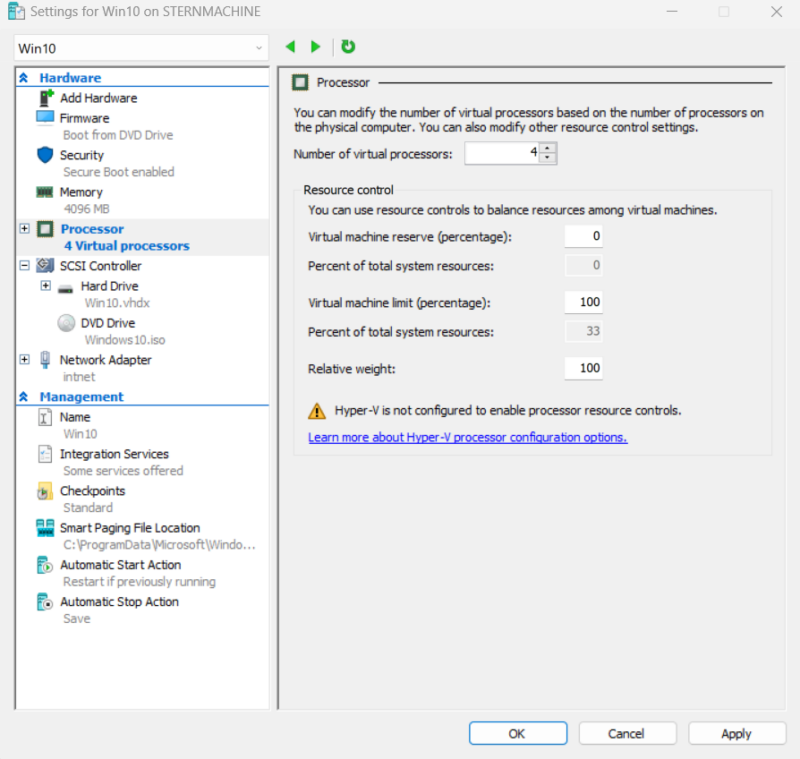
- Processors: I set mine to 6 virtual processors, but 4 is a great starting point.
- Checkpoints: Ensure Standard checkpoints are enabled. This is your “undo” button for the lab.
With your VM selected click Hyper-V Settings on the right side bar.
- Enhanced Session: Ensure enhanced session mode is checked.

Step 5: Installing the Windows Server OS
Start the VM. You may need to quickly press a key to boot from the ISO.
- Proceed through the language and time selection.
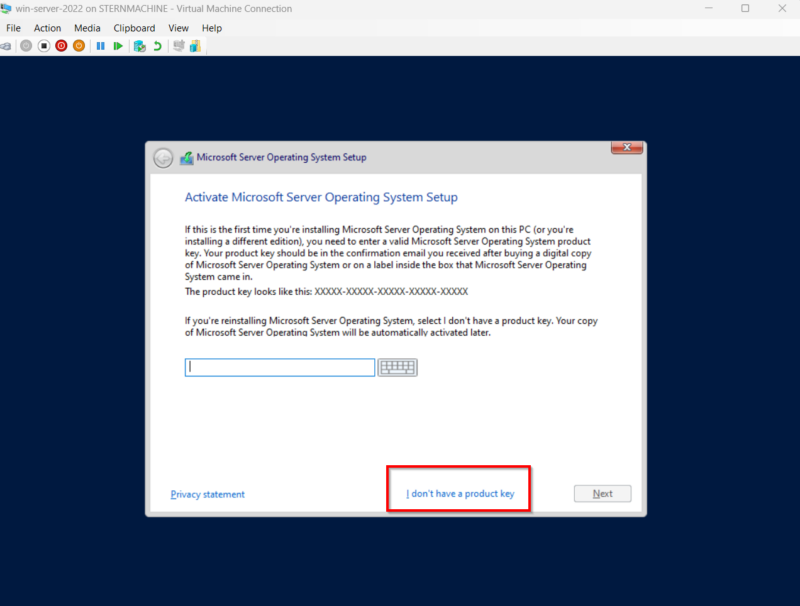
- Click I don’t have a product key.
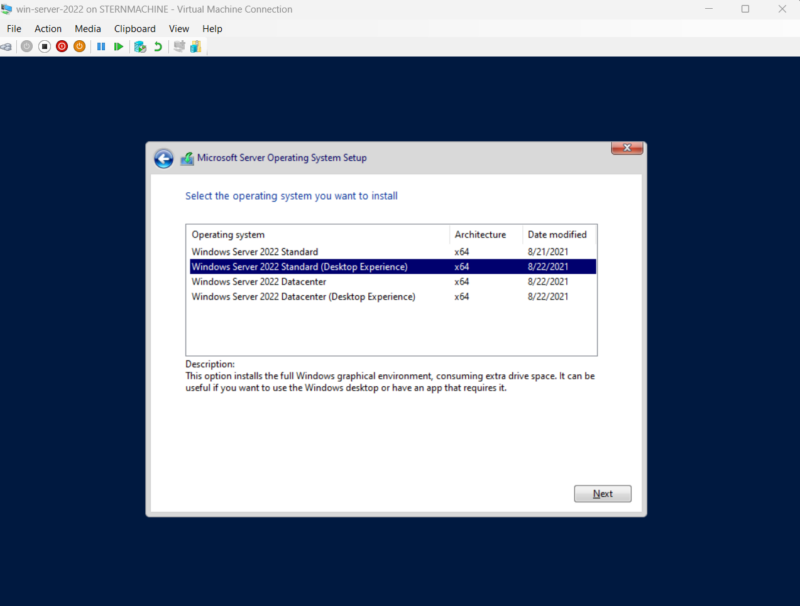
3. Select Windows Server 2022 Standard (Desktop Experience).
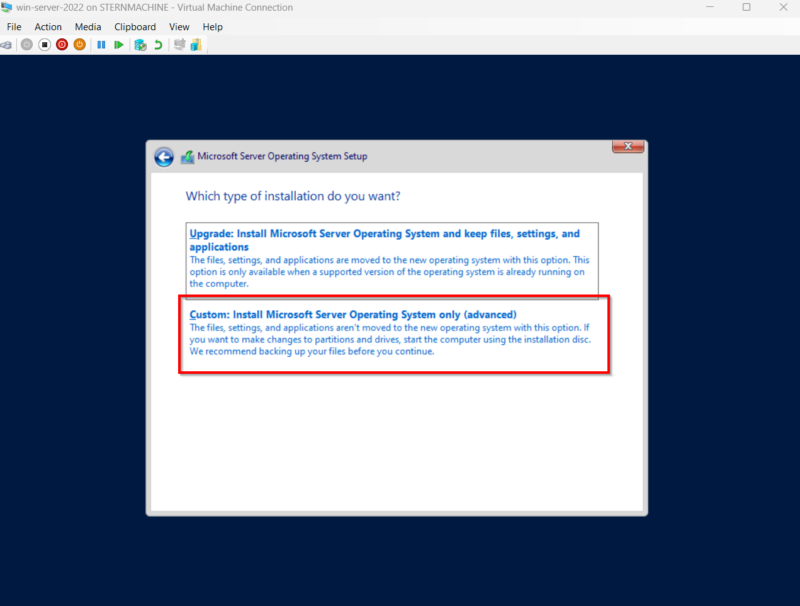
4. Choose a Custom install and select the unallocated virtual disk.

5. After the installation and reboot, create a password for the local Administrator account.
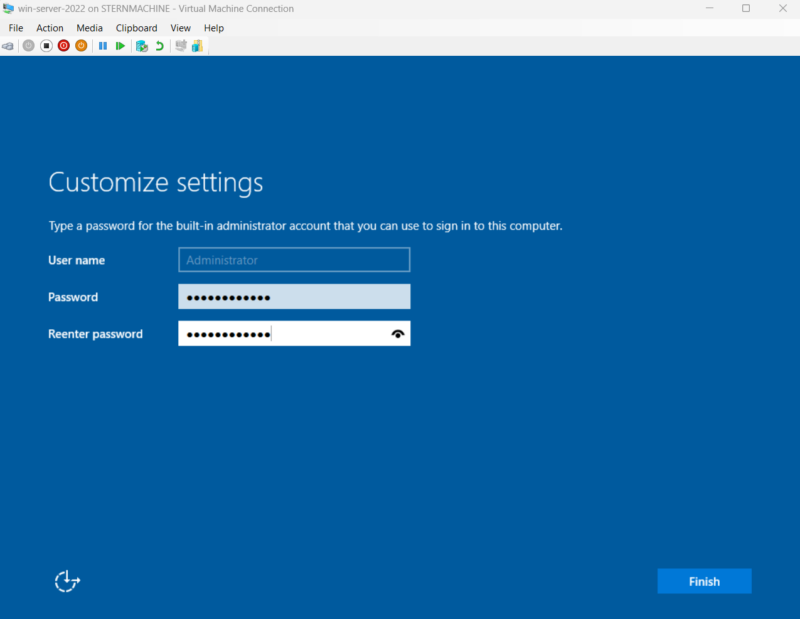
This Administrator account is a local account and is just for initial setup. We can disable or rename this local account later on once our domain is established.
Windows will eventually bring you to the login screen. Enter the password you just created to log in.
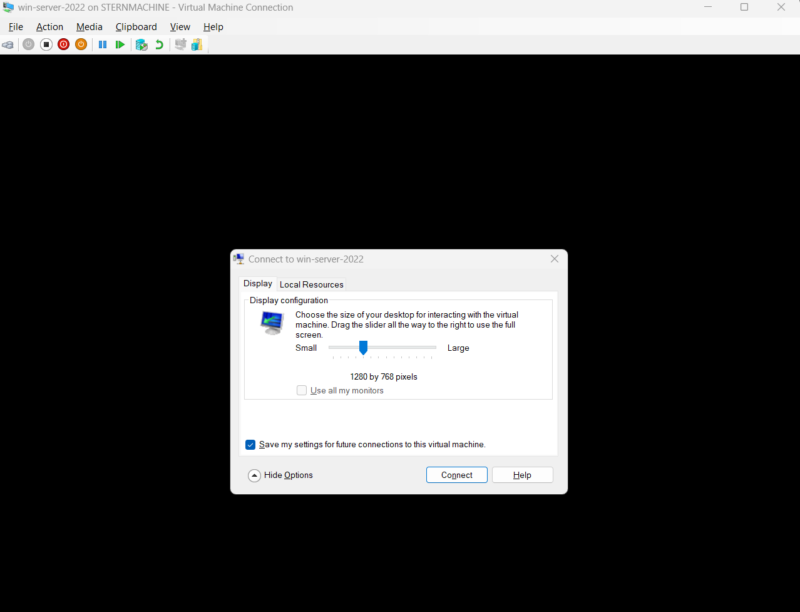
Setting up Enhanced Session: A popup will show to setup enhanced session mode. The first page is the screen size. You can make this custom to what you prefer. I set my windows at 1280 x 768.
- Click on more options and check to save your screen size and additional settings.
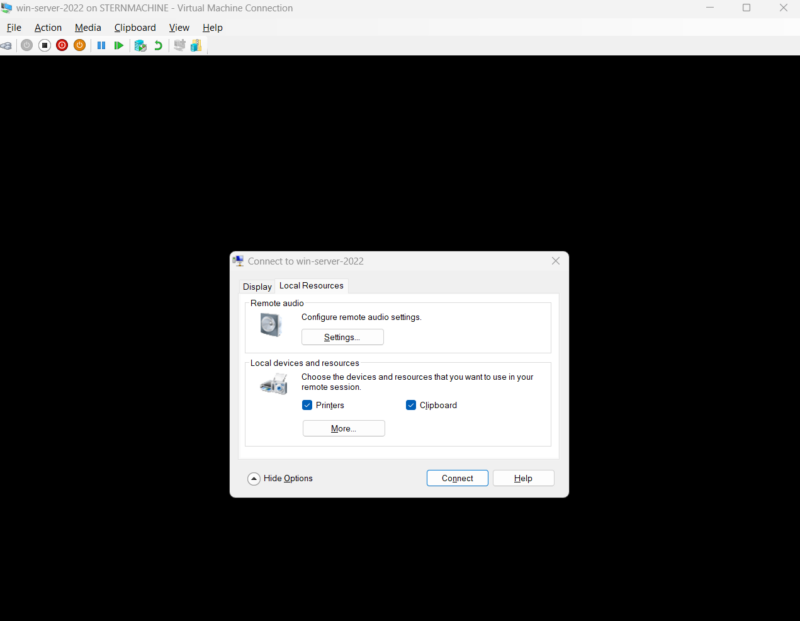
- Click on the local resources tab and show additional options to add. You can add a microphone in the audio settings if you would like. The more important check is to make sure clipboard is checked.
- I also will go to “..” options and link my drives to my virtual machines.
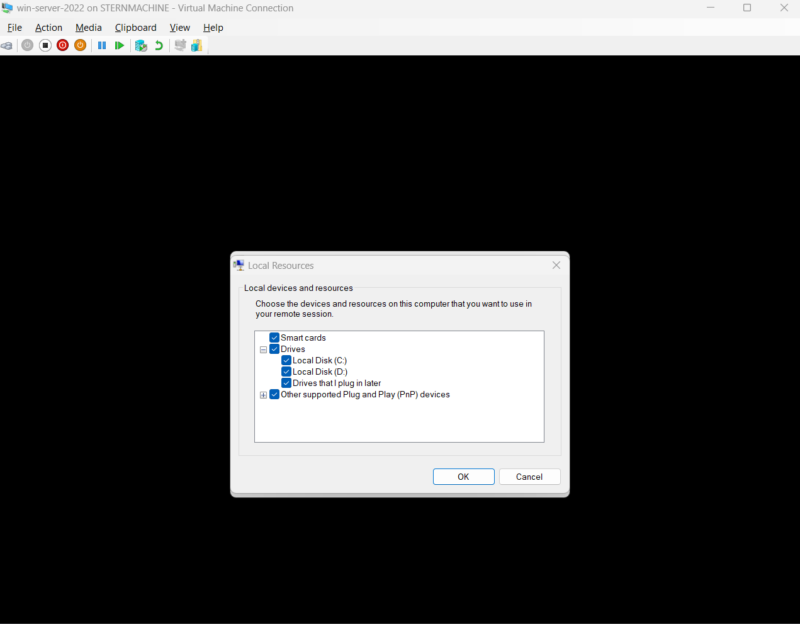
- Finish with Connect to get to the Windows logon page. Login to go to the next steps.
Step 6: Initial Server Configuration
Login with your server’s local administrator account. The Server Manager dashboard should automatically open. Before we add any roles, we need to configure the server’s identity and network settings.
Set a Static IP Address
The Domain Controller must have a fixed address on our internal network.
- Right-click the network icon in the taskbar and go to Network and Internet Settings, then Change adapter options.

2. Right-click the adapter connected to our intnet switch (by default for our current setup, Ethernet 2 will be our internal NIC. Feel free to change your adapter names within your VM if it makes things clearer), select Properties, click on Internet Protocol Version 4 (TCP/IPv4), and then Properties.
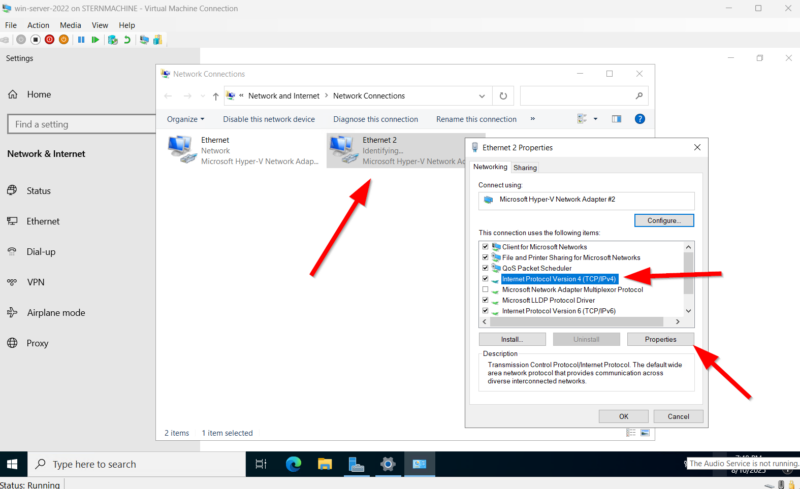
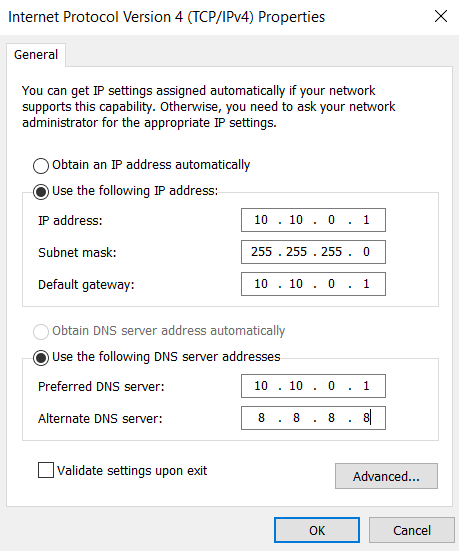
3. Click the radio button to “Use the following IP address” and enter these values:
-
- IP address: 10.10.0.1
- Subnet mask: 255.255.255.0 (This defines a /24 network)
- Default gateway: 10.10.0.1
- Preferred DNS server: 127.0.0.1 (We point it to itself, as it will become our DNS server)
- Alternate DNS server: 8.8.8.8 (A public DNS server for external lookups)
4. Click OK and close the adapter settings.
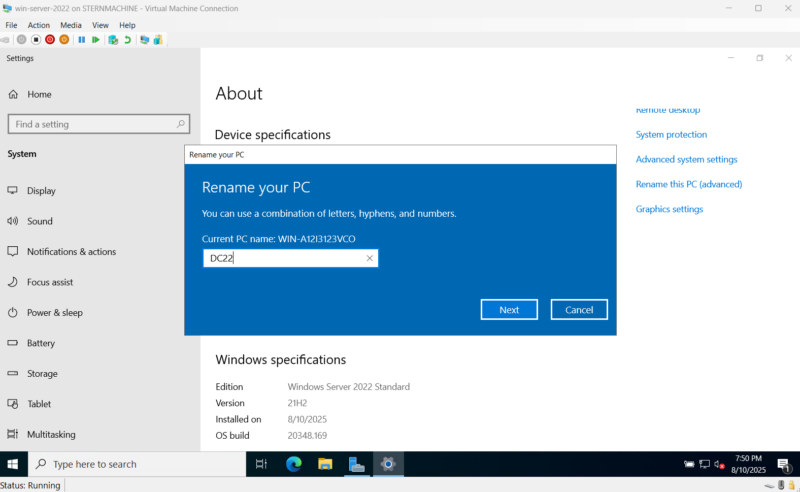
Rename the Server
- In the Windows search bar, type “about” and select About your PC.
- Scroll down and click Rename this PC (advanced).
- In the Computer Name tab, click Change… and enter a new name (e.g., DC22).
- Click OK. Your VM will need to restart for the change to take effect.
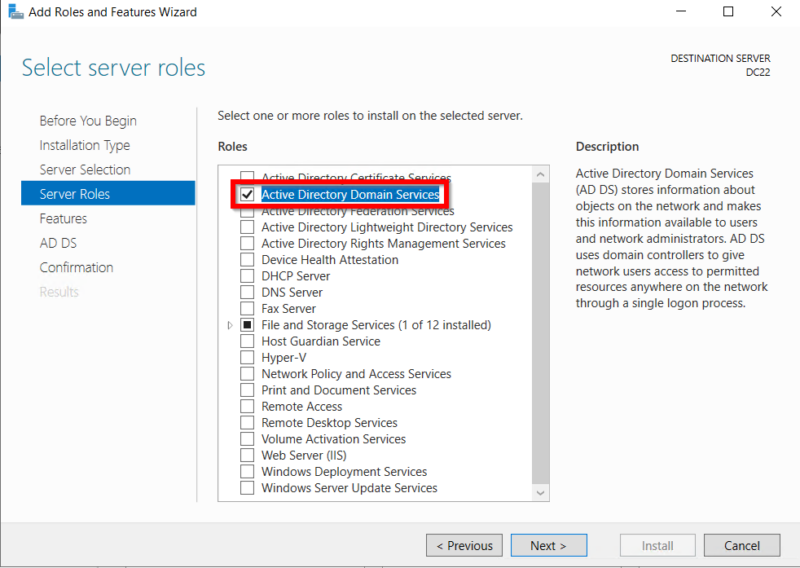
Step 7: Installing and Configuring Active Directory
After the reboot, log back in. From Server Manager, click Manage > Add Roles and Features and install Active Directory Domain Services.
We can keep everything as default here. You will click the Add Features and then click next until you finish install. Once the blue bar is full, you can click close.

After the role is installed, click the notification flag at the top and select Promote this server to a domain controller.
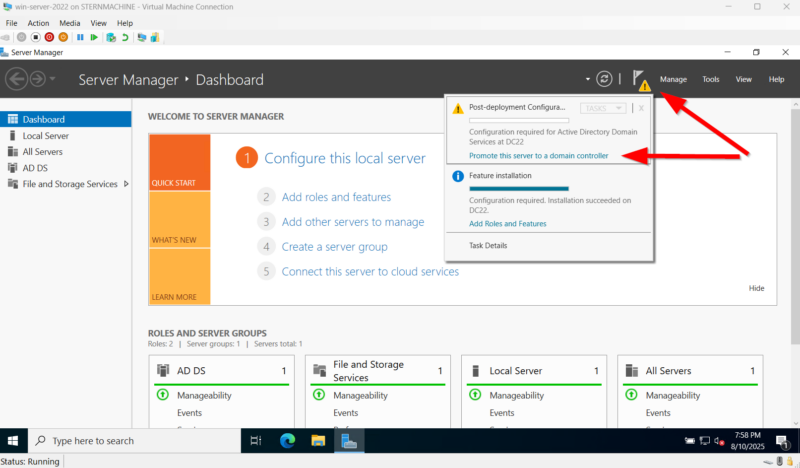
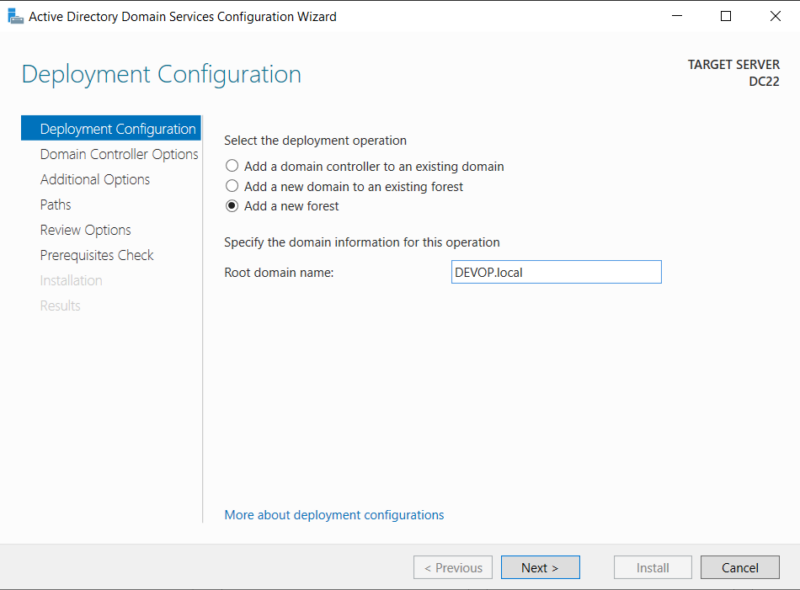
In the AD DS Configuration Wizard:
- Select Add a new forest and give it a Root domain name (e.g., DEVOP.local).
2. Set a DSRM password.

3. Continue through the wizard, accepting the defaults for no DNS delegation, NetBIOS name (this should autofill), and paths.
4. There will be a prerequisite check. As long as you followed everything above, we can ignore these and proceed to install.
5. Click Install at the end. The server will configure itself and reboot automatically.
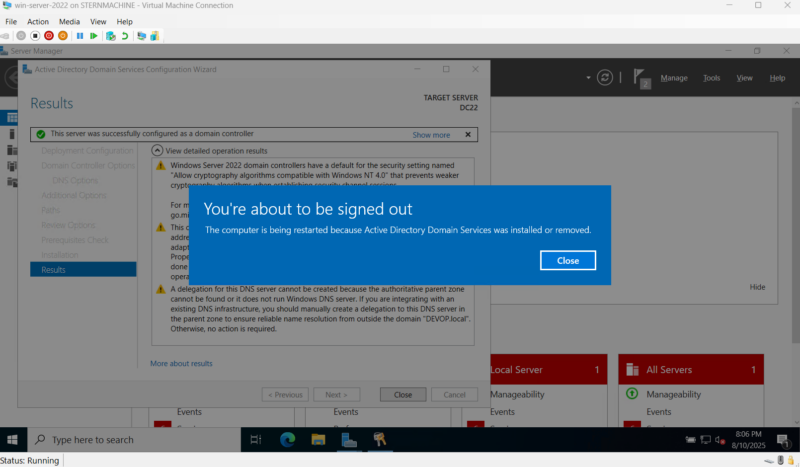
Step 8: Creating a Domain Administrator Account
After the server reboots, log in as DEVOPAdministrator. We’ll create a new admin account.
- In Server Manager, go to Tools > Active Directory Users and Computers.

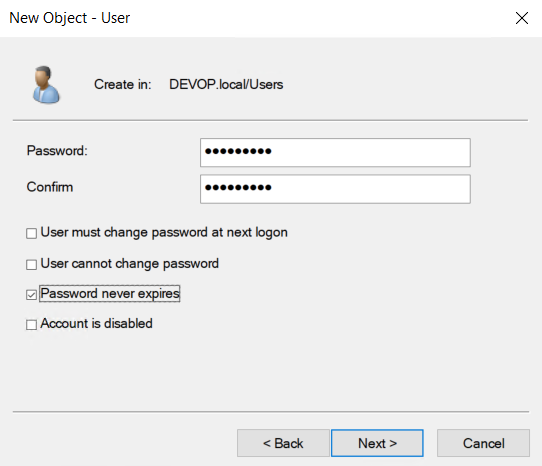
2. In the Users container, right-click and select New > User.
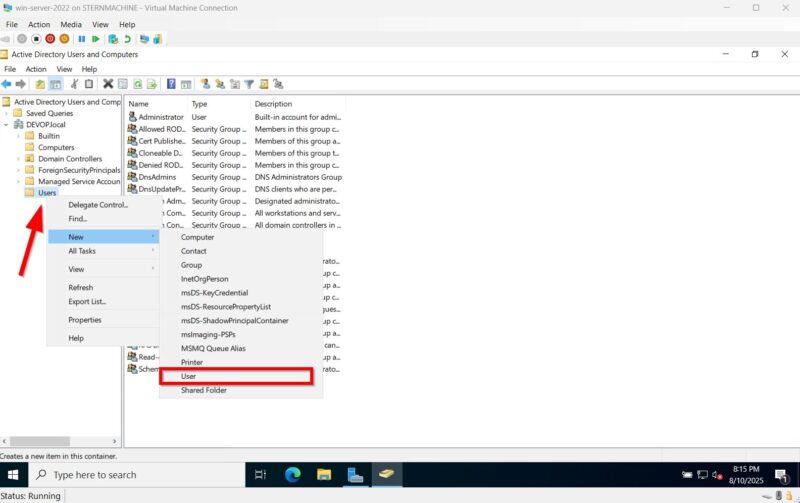
3. Create a new user (e.g., logon name devopadmin). Set a password and check Password never expires.
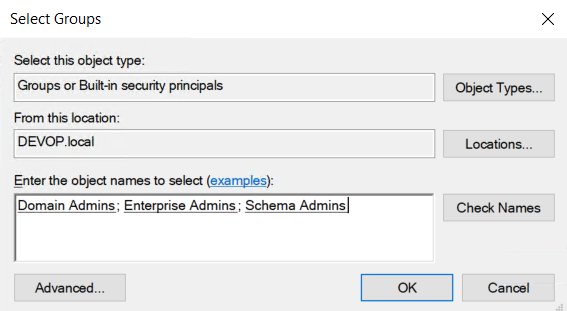
4. Right-click the new user, go to Add to Group.

5. Add the user to these groups: Domain Admins; Enterprise Admins; Schema Admins.
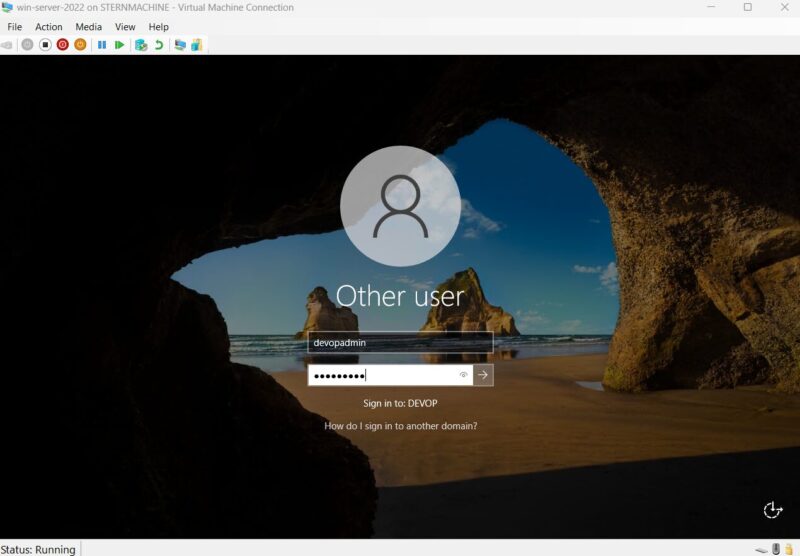
6. Reboot one last time and log in as your new domain admin (DEVOPdevopadmin).
Step 9: Installing and Configuring DHCP
To assign IPs automatically, we need DHCP.
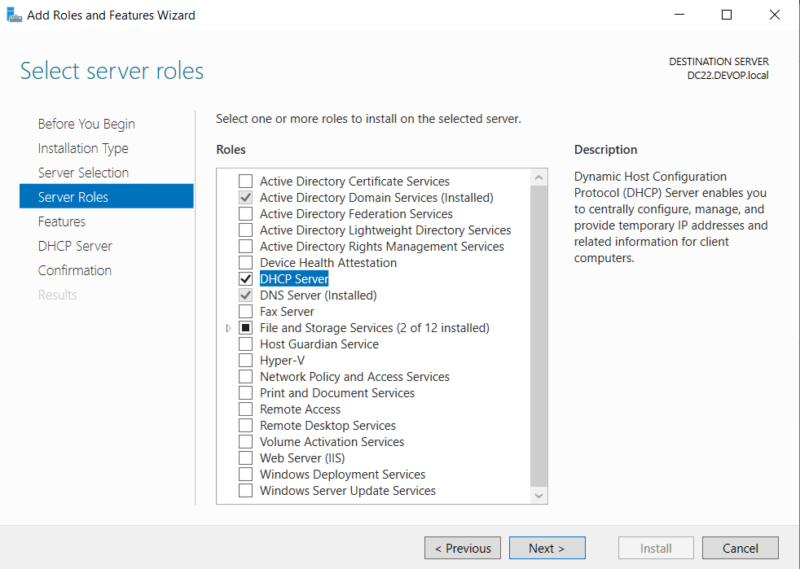
- From Server Manager, Add Roles and Features and install the DHCP Server role.
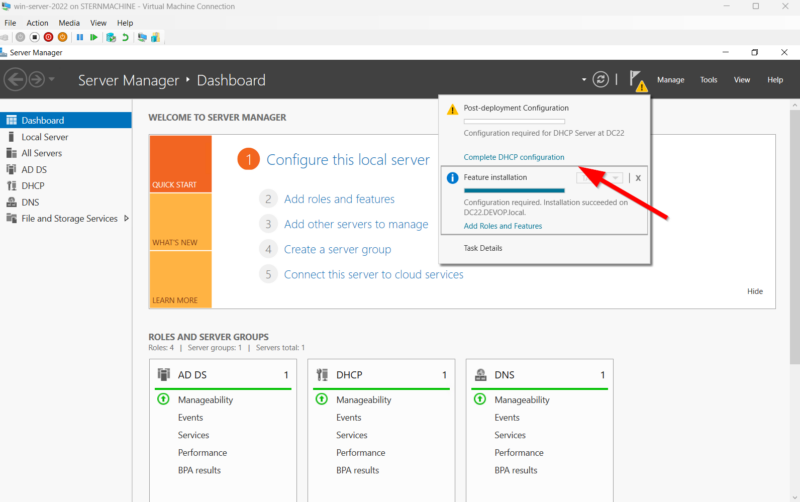
2. Keep all our defaults and after installation, click the notification flag and Complete DHCP configuration,
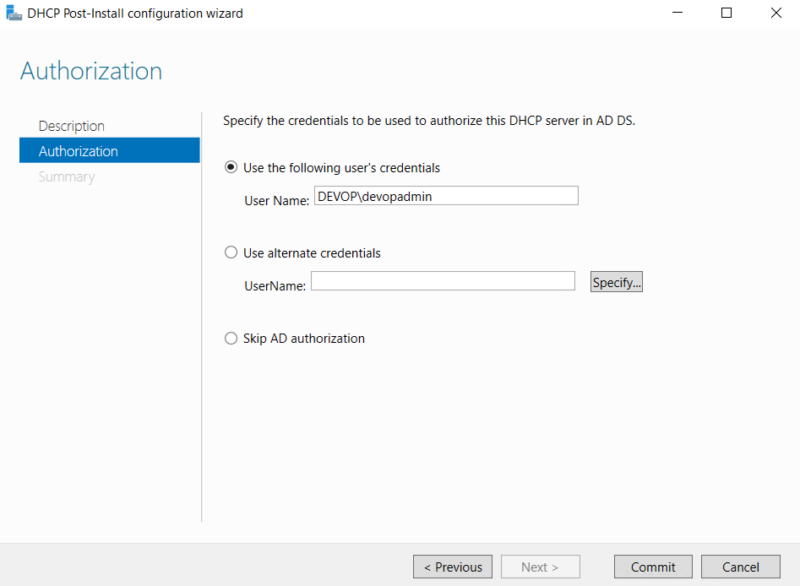
3. Commit your devopadmin credentials.
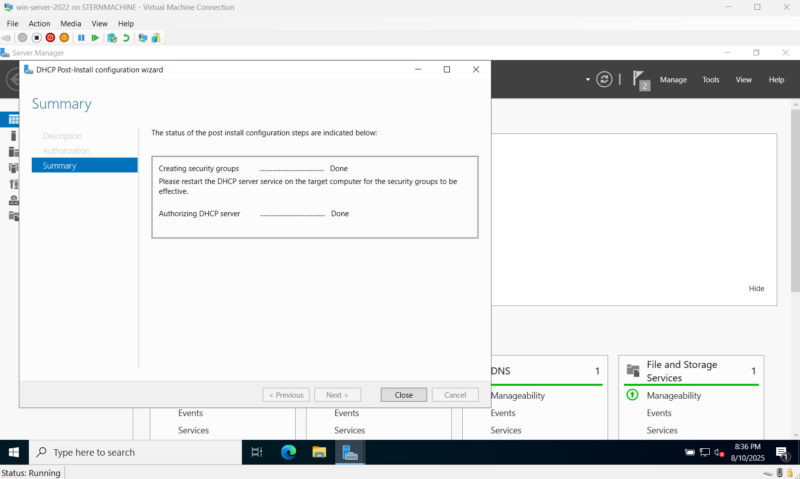
4. If successful we should see two done messages after our committment.
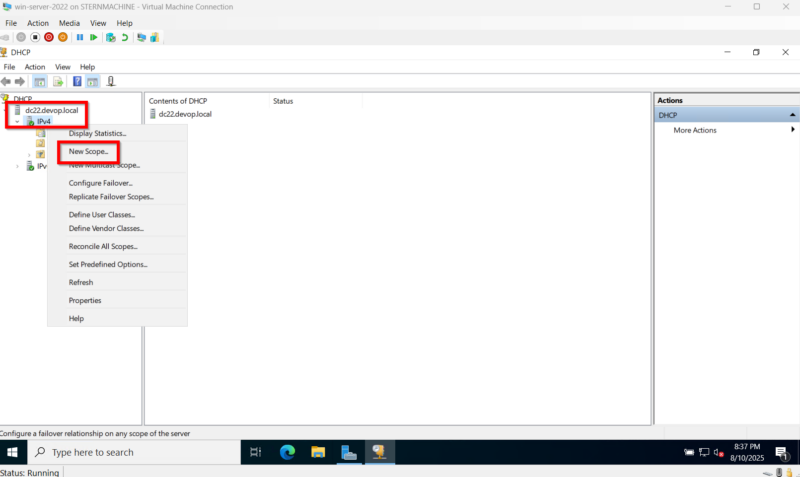
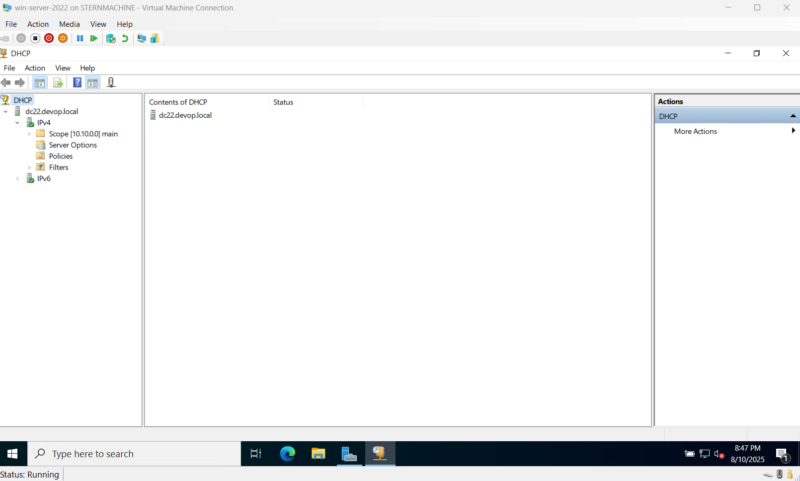
5. Go to Tools > DHCP. Right-click IPv4 and select New Scope….
6. In the wizard, define a name and description. These can be super simple and do not matter.
7. For the IP Address Range, assign outside your static assignments (e.g., start 10.10.0.100, end 10.10.0.200). You need to make sure you are within your subnet mask to be able to see the hosts you assign within your DHCP.
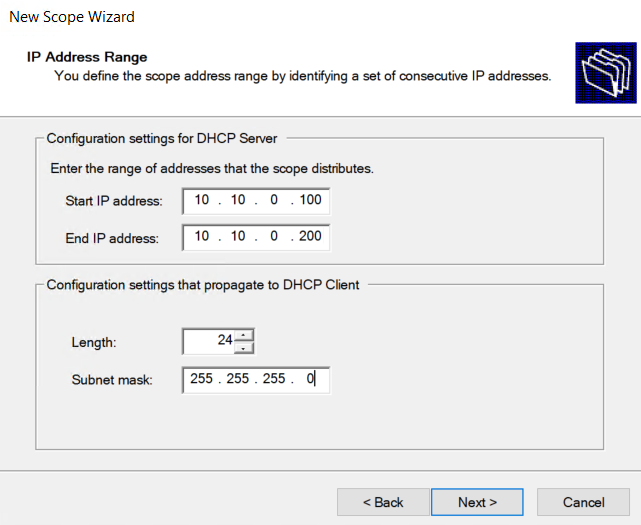
8. You do not need to add any exclusions because you saved enough space by assigning everything north of .100.
9. Lease duration is up to you. I set mine to 30 days.
10. Configure Now
11. Set the Router (Default Gateway) to your DC’s IP: 10.10.0.1 and click add.
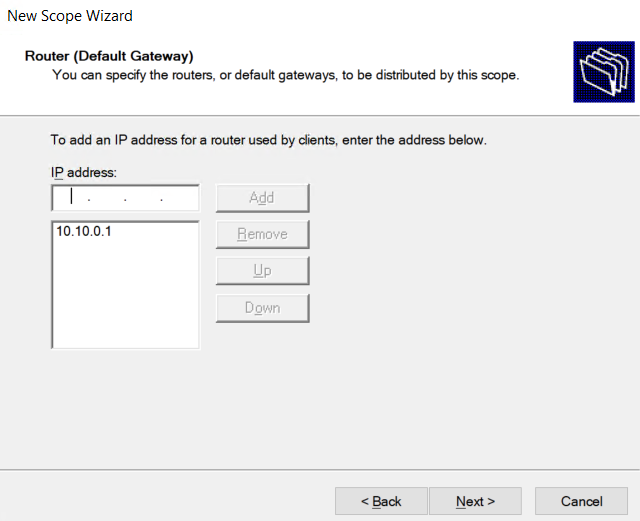
11. Proceed through the wizard, accepting the defaults, and activate the scope.
12. You should see a green checkmark and your scope in the left side bar.
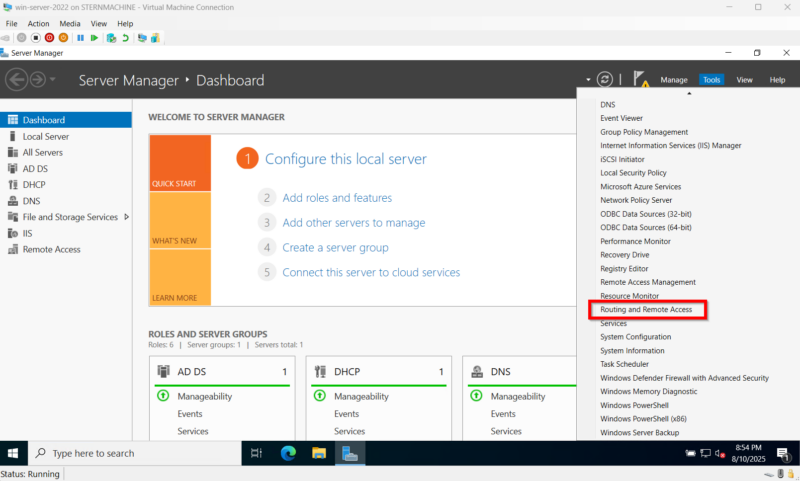
Step 10: Setting up Internet Routing with Remote Access Service
To give our internal network internet access, we’ll configure RAS.
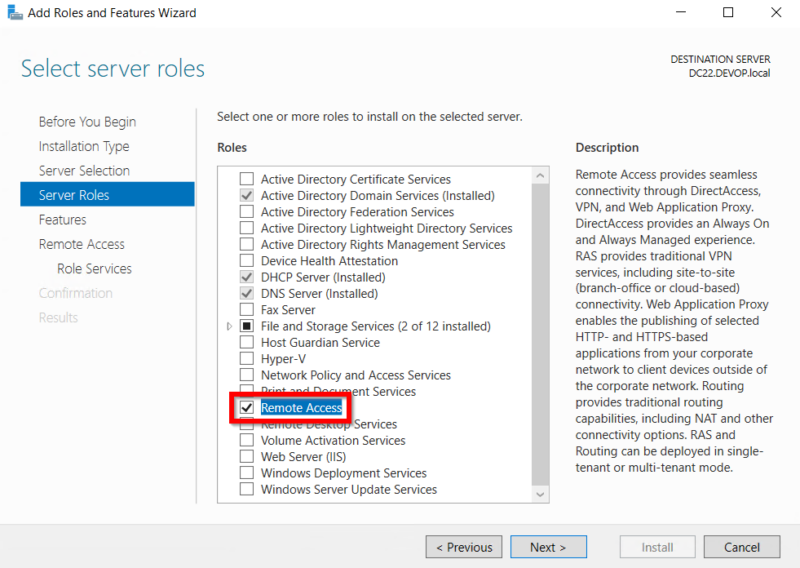
- From Server Manager, Add Roles and Features and install the Remote Access role.
2. In the role services, select Routing this should also automatically add DirectAccess and VPN.

3. Confirm default for the rest of the installation.
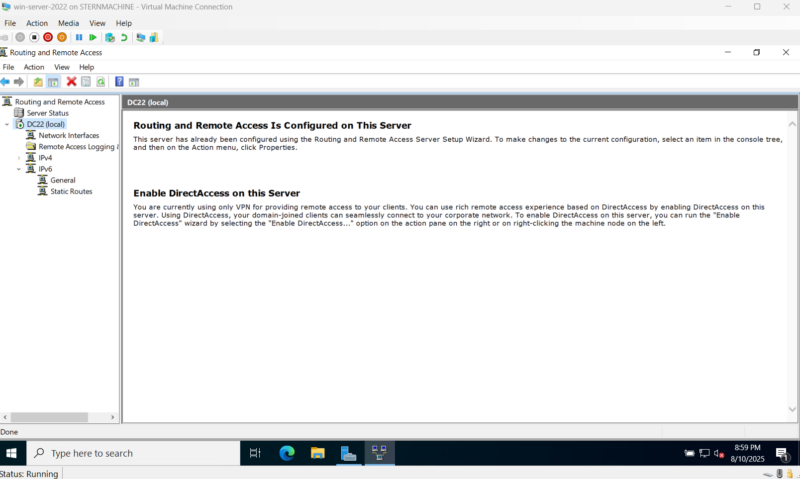
4. Ignore the “Getting Started Wizard” link. Go to Tools > Routing and Remote Access.
5. Right-click your server (with the red arrow) and Configure and Enable Routing and Remote Access.

6. Select Network address translation (NAT).

7. The Wizard Bug: If the network interface box is empty, close the wizard and run it again. The second time, it should work.
8. Select your extnet adapter as the public, internet-facing interface. If you did not rename your adapters, it should be your Ethernet adapter. A DHCP indicator should point you to the right direction. The ip address will also not be the static address we configured.

9. Finish the wizard. You should see additional interfaces and a green up arrow on your domain controller to indicate everything is working.
10. A final reboot is recommended.
From this point, the Domain Controller is good to go! You will need to always have this DC running for your other domain-joined devices to communicate with each other and the internet.
TIP!  If you are like me and would like to have Windows Sandbox enabled on your VMs, shut down the VM and run the following command in an administrative PowerShell on your host machine:
You will change the vm_name variable to what you called your VM.
Step 11: Installing the Attacker VM (Kali Linux)
With our Windows environment configured, it’s time to set up our attacker machine. This involves getting the ISO, creating the VM, installing the OS, and configuring it for our lab. The steps are detailed in a previous section, covering everything from VM creation to running post-installation network checks.
Get the Kali Linux ISO
First, head to the official Kali Linux website (https://www.kali.org/get-kali/) and select Installer Images. Download the standard 64-bit “Installer” ISO file. This is meant for bare-metal and standard VM installations.
Create the Kali VM in Hyper-V
- In Hyper-V Manager, open the New > Virtual Machine… wizard.
- Name: Kali
- Generation: Select Generation 2.
- Memory: Assign at least 4096 MB (4 GBs). Dynamic Memory is fine here too.
- Networking: This is critical. In the dropdown, connect the VM to our intnet switch. This places it on our internal lab network.
- Virtual Hard Disk: Create a new disk. A size of 60 GB is a good starting point.
- Installation: Point the wizard to the Kali Linux ISO you just downloaded.
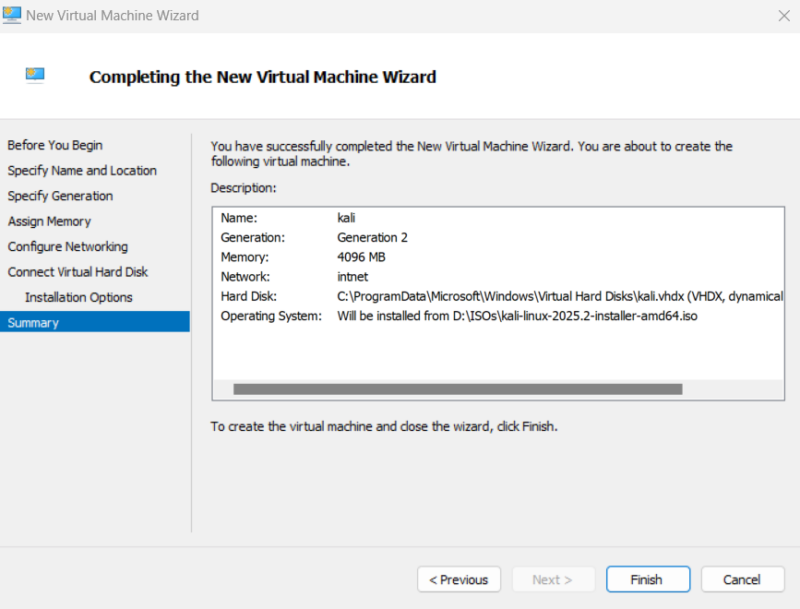
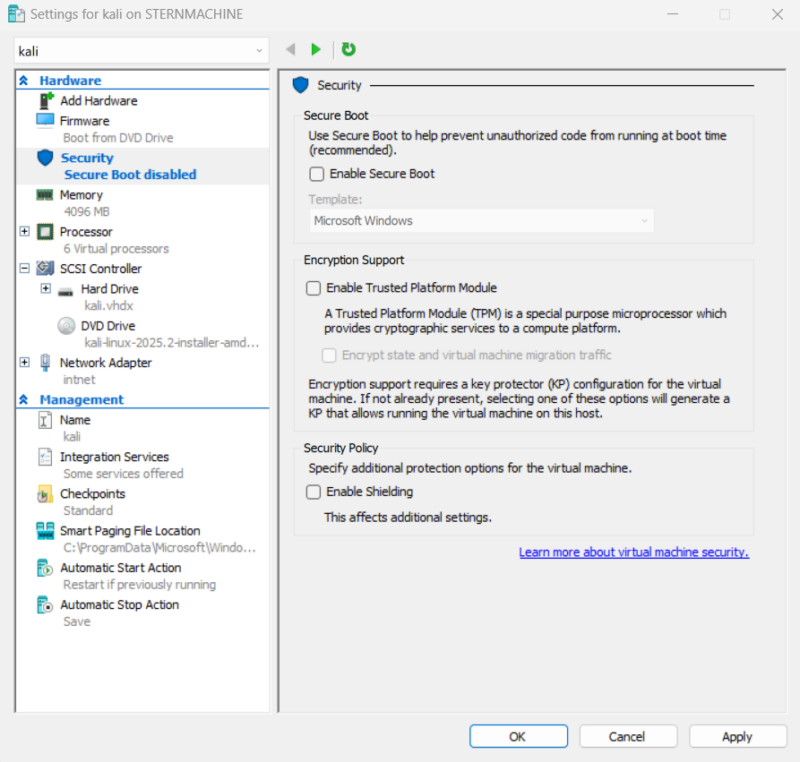
8. Click Finish. Before starting the VM, right-click it, go to Settings > Processors, and change the virtual processor count to at least 4. Then, go to the Security tab and uncheck the box for “Enable Secure Boot”.
Install Kali Linux
Start the VM. You’ll be greeted by the Kali Linux boot menu.
- Using your arrow keys, select Graphical install and press Enter.
- Proceed through the initial setup screens, selecting your preferred language, location, and keyboard layout.
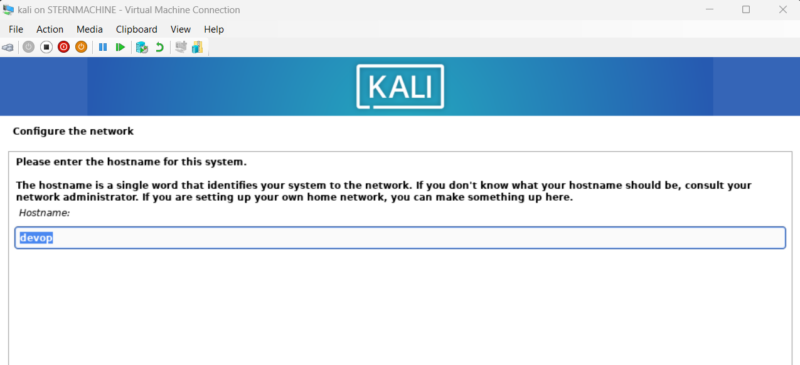
- Configure the network: It will ask for a hostname (e.g., kali) and a domain name (you can leave this blank or enter devop.local).
4. Set up users and passwords: Create a non-root user account. You’ll enter your full name, a username for your account, and a password.
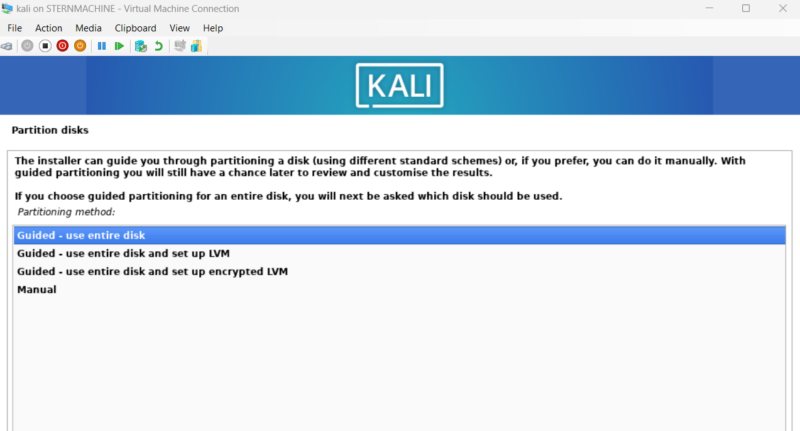
5. Partition disks: For a lab VM, the simplest option is Guided – use entire disk.
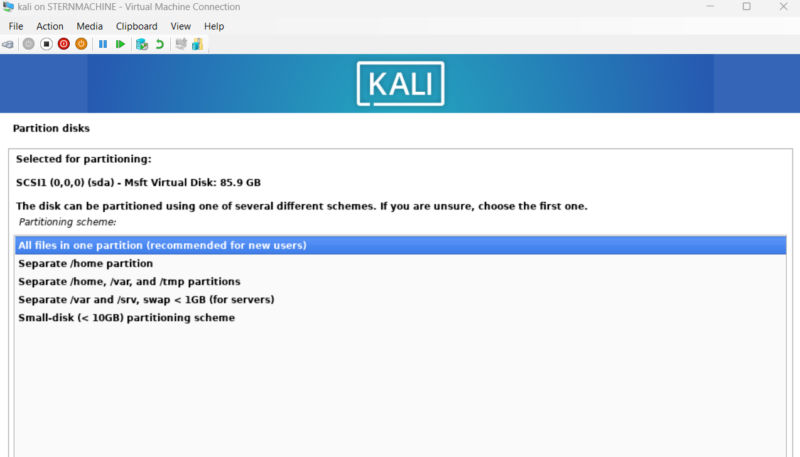
6. Select the virtual disk presented, choose All files in one partition, and then Finish partitioning and write changes to disk. Confirm Yes to write the changes.
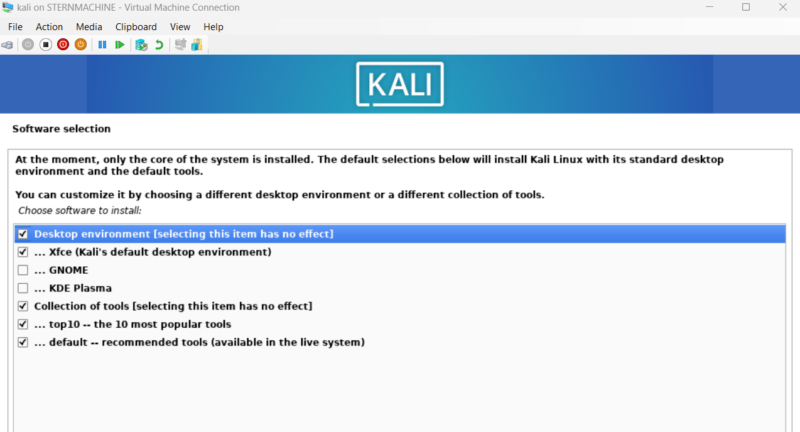
7. Software selection: You’ll be asked what desktop environment and tools to install. The default selection with XFCE and the default recommended tools is perfect for most use cases.
8. Finish the installation: Once it’s complete, reboot.
Enable Enhanced Session Mode
For a much better user experience with features like a dynamic resolution and shared clipboards, we’ll enable Enhanced Session Mode. Modern versions of Kali make this incredibly simple.
Configure Kali: After logging into your new Kali VM, open a terminal and run the built-in configuration tool:
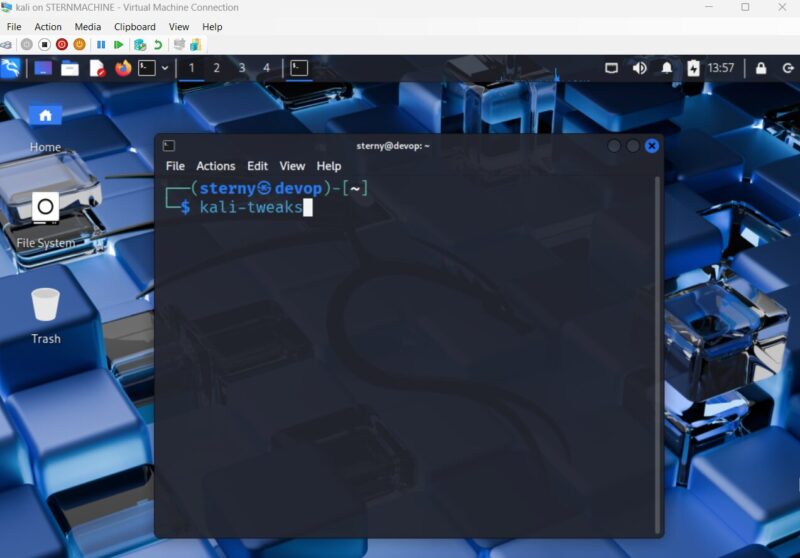
- A menu will appear in your terminal. Use the arrow keys to navigate to the Virtualization section and press Enter.

- Select the option Configure the system for Hyper-V enhanced session mode and press Enter. The tool will automatically install the necessary packages. That’s all there is to do on Kali’s side.

2. Configure the VM from your Host: Shut down the Kali VM. On your Windows host machine, open an administrative PowerShell window and run the following command, replacing “Kali” with your VM’s name if you chose something different.
![]()
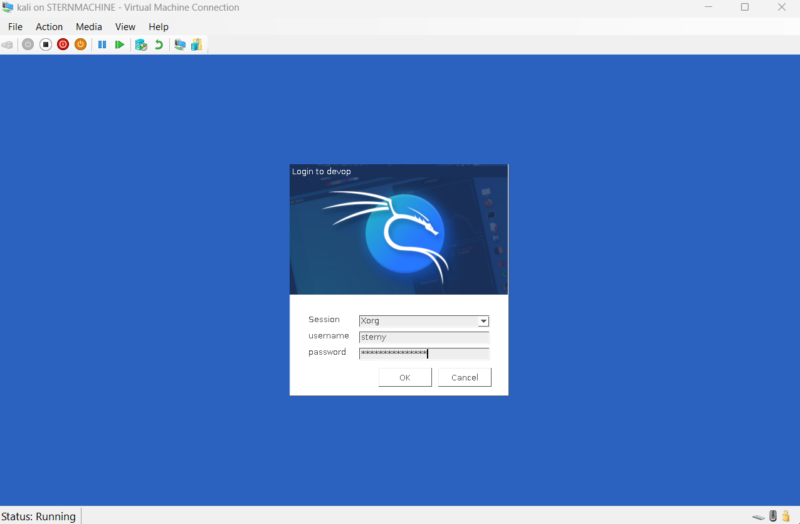
- Start your Kali VM again. When you click Connect, you should now be greeted with the Enhanced Session dialog, where you can select your screen resolution before logging in. If you get a pop out to either Revert or Continue, just continue.
- After setting up your Enhanced Session setup, you will have a different looking login screen. Enter your credentials as normal to login.
Post-Installation Network Checks
After rebooting and connecting with an enhanced session, log in and let’s verify our network is working as expected.
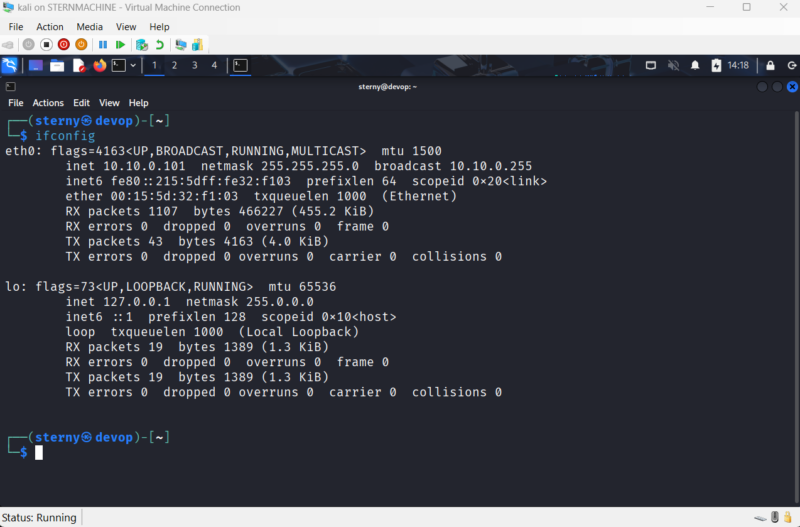
- Open a terminal window.
- Check your IP address: Run the command ‘ifconfig’. You should see an eth0 interface with an IP address assigned by our DC’s DHCP server (e.g., 10.10.0.101). This confirms DHCP is working and you can reach your DC.
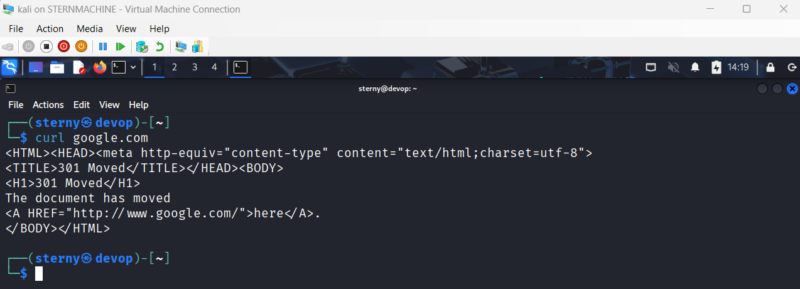
3. Check for Internet access: Run curl https://www.google.com. You should see the HTML source of Google’s homepage. This confirms our DC’s NAT routing is working correctly.
4. Update your system: Finally, it’s always good practice to fully update a new install. Run sudo apt update && sudo apt upgrade -y. Enter your password when prompted.
Step 12: Adding a Windows 10 Workstation
This is all we need to have a working lab: Active Directory with a domain controller, and an attacker box. We should spread this out to our other VMs to get a good handle on what we see during an average penetration test. Let’s start by setting up our Windows 10 workstation. The steps for this are detailed in the previous section.
Get the Windows 10 ISO
First, you’ll need the installation media. Google “Windows 10 Enterprise Evaluation” to find the official Microsoft page where you can download a free, 90-day evaluation ISO.
Create the Windows 10 VM in Hyper-V
- In Hyper-V Manager, open the New > Virtual Machine… wizard.
- Name: WIN10
- Generation: Select Generation 2.
- Memory: Assign 4096 MB (4 GBs). Dynamic Memory is recommended.
- Networking: Connect the VM to our intnet switch. This is essential for it to join our domain.
- Virtual Hard Disk: Create a new disk. A size of 45 GB is a fine.
- Installation: Point the wizard to the Windows 10 ISO you downloaded.

8. Security: Before starting, go into the VM’s Settings, select the Security tab, and ensure Enable Secure Boot is checked. This is not necessary and if you are having problems, this can be unchecked.
9. Processors: Go to the Processors tab and assign at least 4 virtual processors.
Install Windows 10
Start the VM and boot from the ISO. The installation process is straightforward but requires one specific choice during setup.
- Proceed through the language and region selection screens.
- Click Install now.
- Click I don’t have a product key.
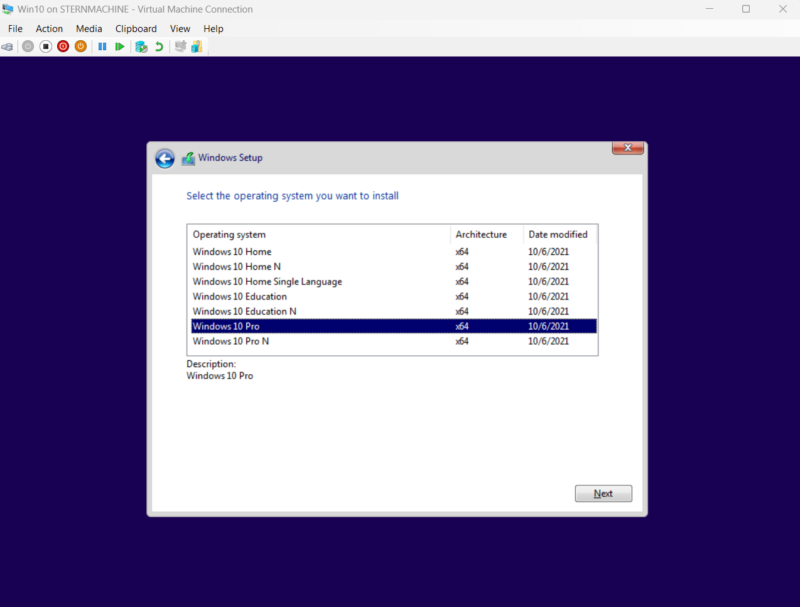
- Select the operating system version, typically Windows 10 Pro.
5. Accept the license terms.
6. Choose Custom: Install Windows only (advanced). Select the unallocated drive and click Next. This is the same setup as our previous Windows host.
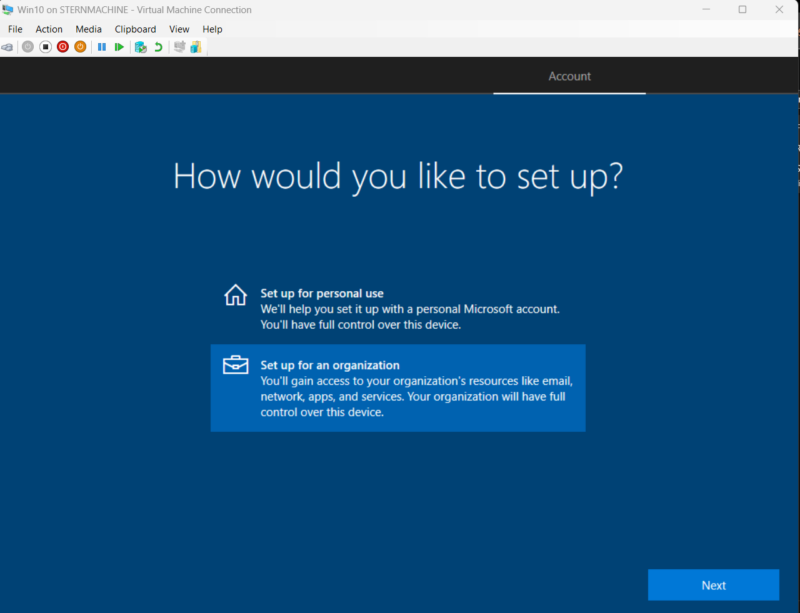
7. When asked “How Would You Like To Setup”, select Set Up For an Organization.
8. On the next screen, do not sign in with a Microsoft account. Click Domain Join Instead in the bottom left corner.
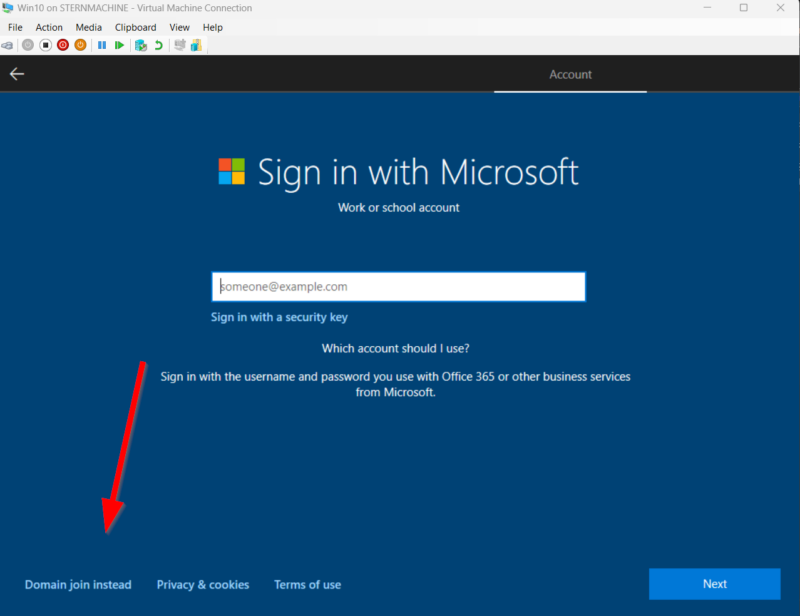
9. You will then be prompted to create a local account. This is just temporary for setup. Create a user (e.g., user) and a password. Complete the remaining privacy setting prompts.
Change Hostname and Join the Domain
Once you log in with the temporary local account you just created, it’s time to join the machine to our DEVOP.local domain.
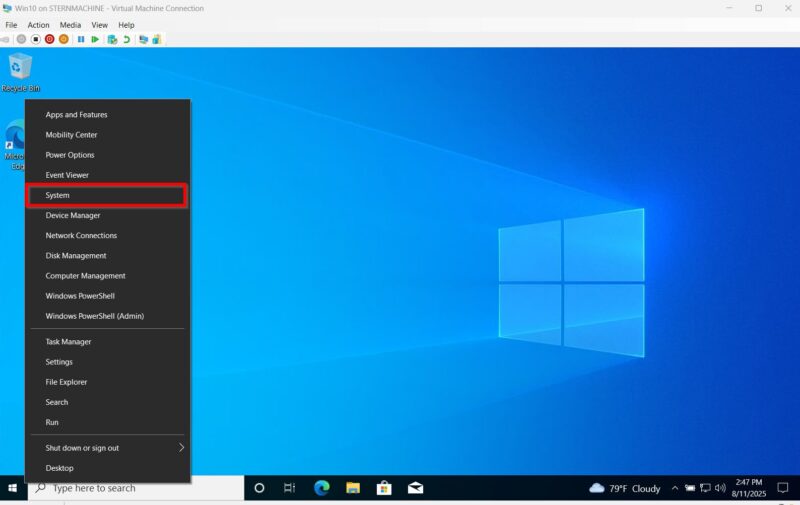
- Right-click the Start Menu and select System.
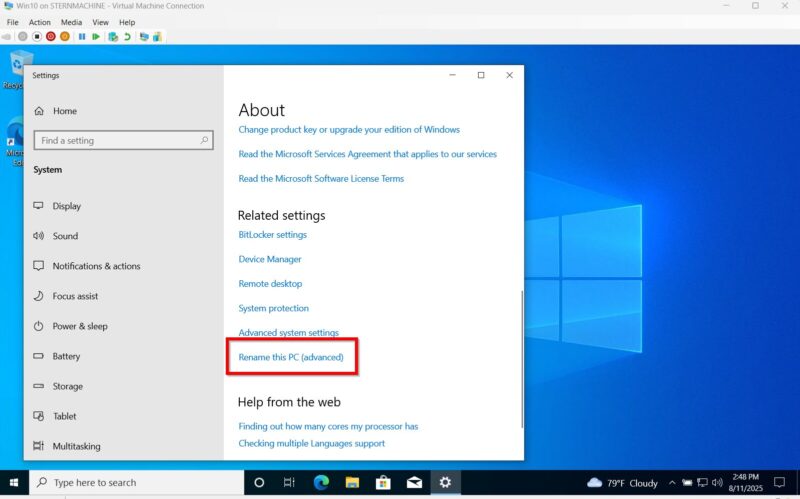
2. Scroll down and click on Rename this PC (advanced).
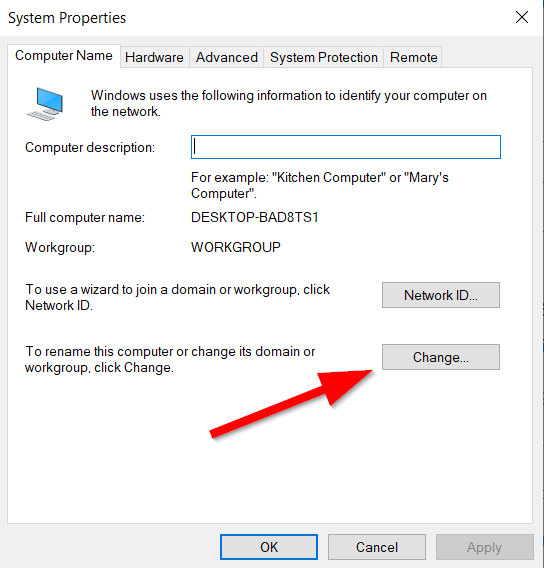
3. In the Computer Name tab, click the Change… button.
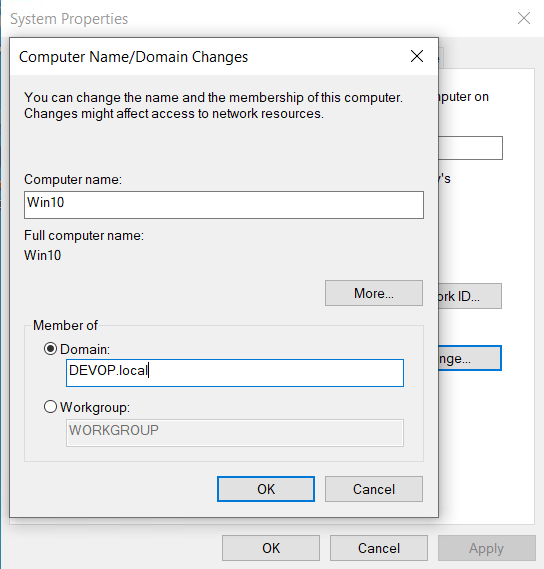
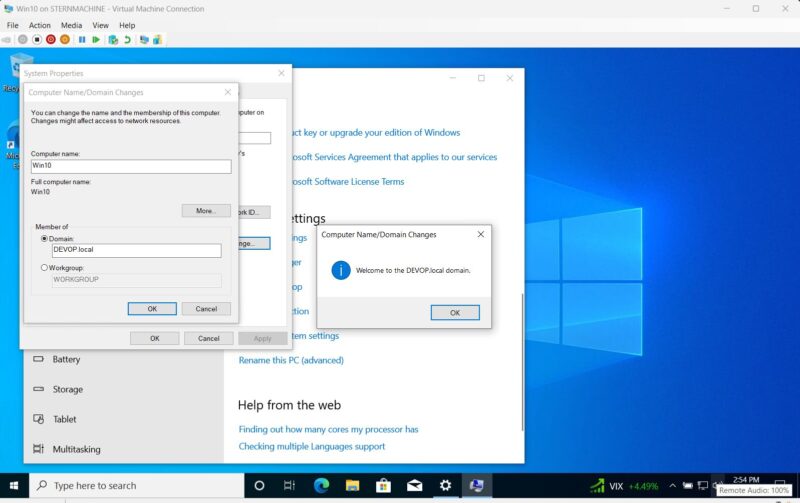
4. Change the Computer name to Win10.
5. Under Member of, switch the radio button from “Workgroup” to “Domain”.
6. Type your domain name: devop.local.
7. Click OK. A credentials box will pop up.
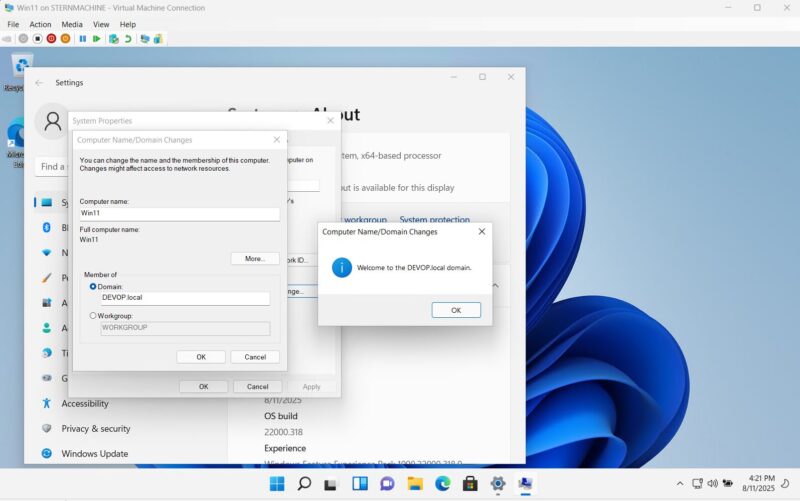
8. Enter the username and password for our domain administrator: DEVOPdevopadmin and its password.
9. Click OK. You should receive a “Welcome to the devop.local domain” message.
10. You will be prompted that a restart is required. Close all windows and restart the VM.
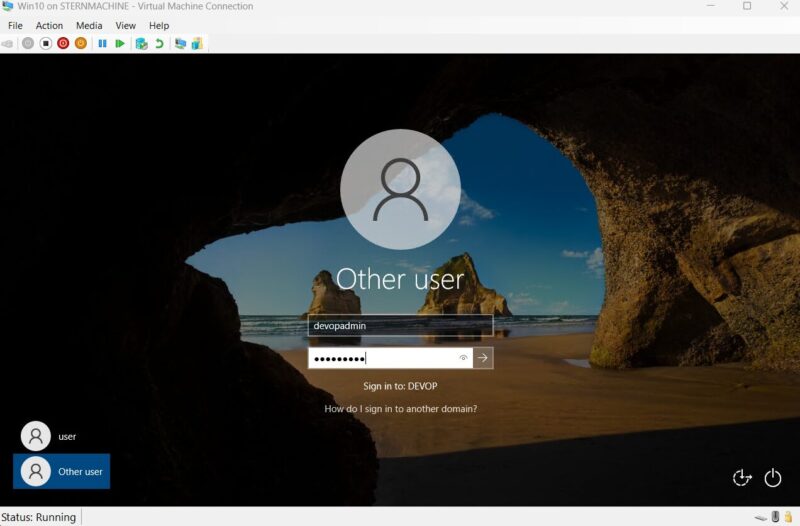
Final Verification
After the machine reboots, you can now log in with a domain account. At the login screen, click “Other user” and enter the credentials DEVOPdevopadmin to confirm the domain join was successful.
Step 13: Adding a Windows 11 Workstation
We will now look to install Windows 11. This process is very similar to installing Windows 10, but the strict hardware requirements for Windows 11 mean we have to perform a bypass during setup. We will also need to keep the machine offline initially to create a local account.
Get the Windows 11 ISO
First, Google “Windows 11 Enterprise Evaluation” to find and download the official 90-day evaluation ISO from Microsoft.
Create the Windows 11 VM in Hyper-V
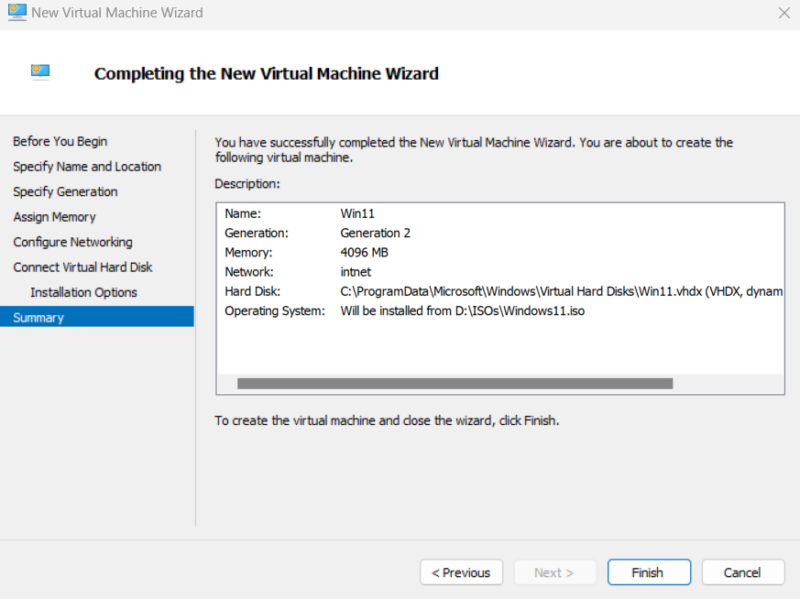
- In Hyper-V Manager, open the New > Virtual Machine… wizard.
- Name: WIN11
- Generation: Must be Generation 2.
- Memory: Assign at least 4096 MB (4 GBs). This is required for a Windows 11 install.
- Networking: This is important. For the initial setup, leave this set to Not Connected. We will add the network adapter after installation.
- Virtual Hard Disk: Create a new disk with at least 45 GB of space.
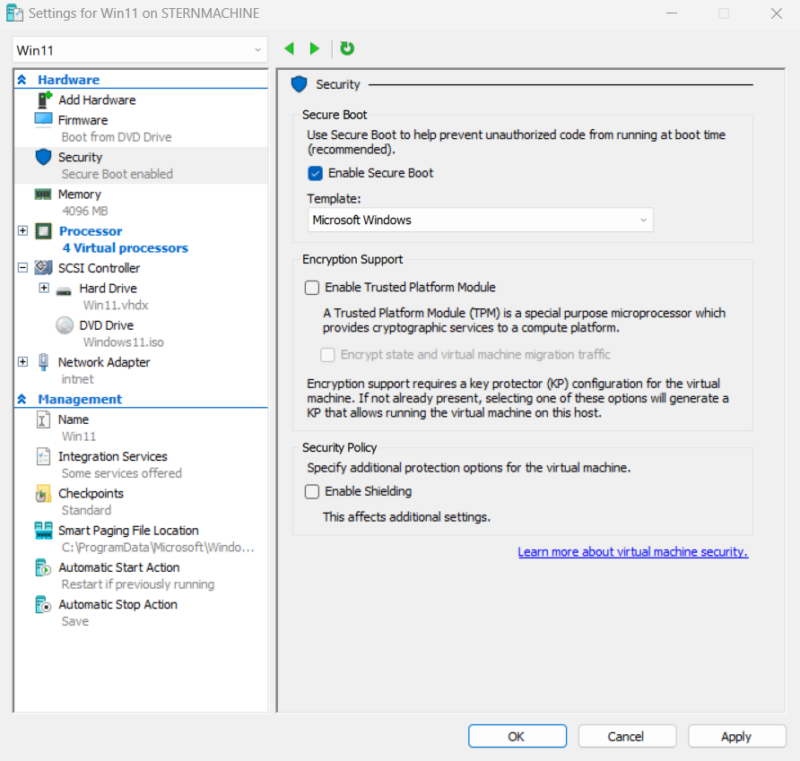
7. Security: Go into the VM’s Settings > Security. Ensure that Enable Trusted Platform Module is checked. This is the correct way to meet the TPM 2.0 requirement in Hyper-V and can prevent the need for manual bypasses.
8. Processors: Assign at least 4 virtual processors.
Install Windows 11 & Bypass System Checks
Start the VM and boot from the ISO.
- Proceed through the language and region screens and click Install now.
- Click I don’t have a product key. Choose your OS version (e.g., Windows 11 Pro).
- When you get to the screen that says “This PC can’t run Windows 11”, don’t worry. This is where we perform the bypass.

4. Press Shift + F10 on your keyboard. A command prompt window will open.
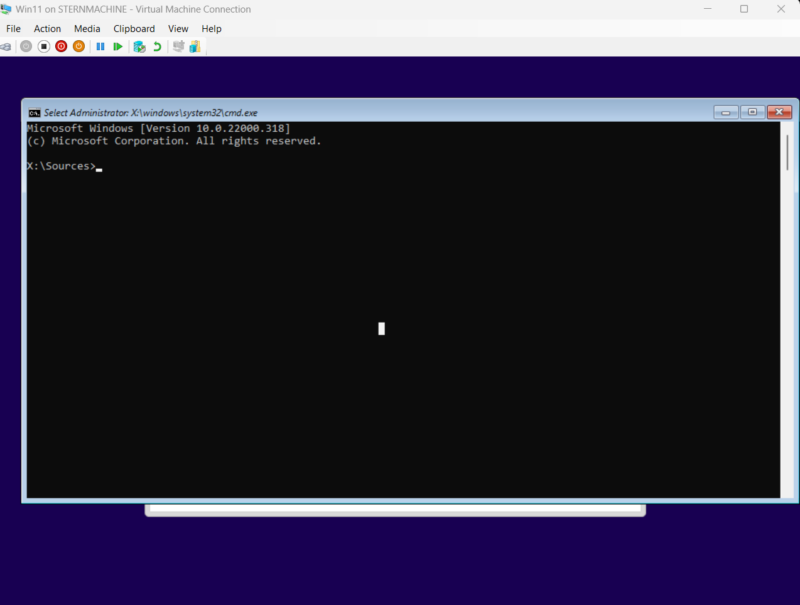
5. Type regedit and press Enter to open the Registry Editor.

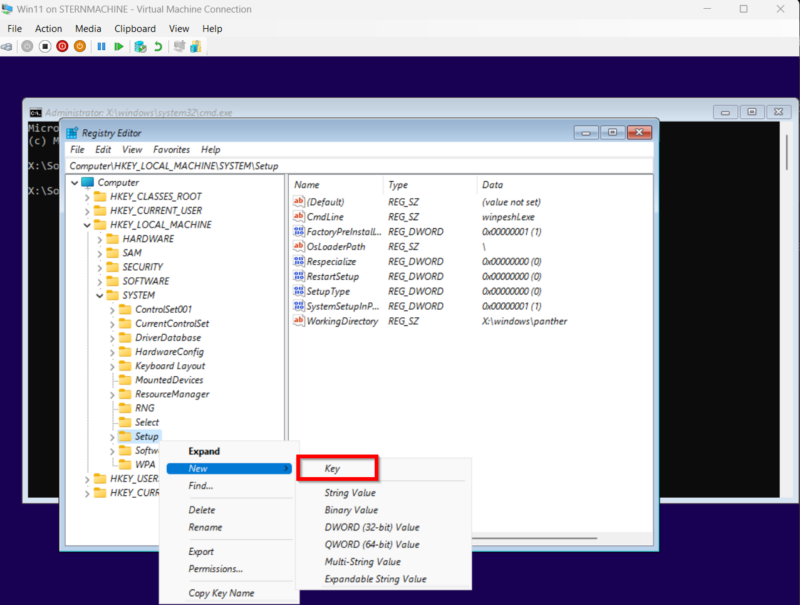
6. Navigate to the following path: HKEY_LOCAL_MACHINESYSTEMSetup
7. Right-click on the Setup key in the left pane, and select New > Key. Name the new key LabConfig.
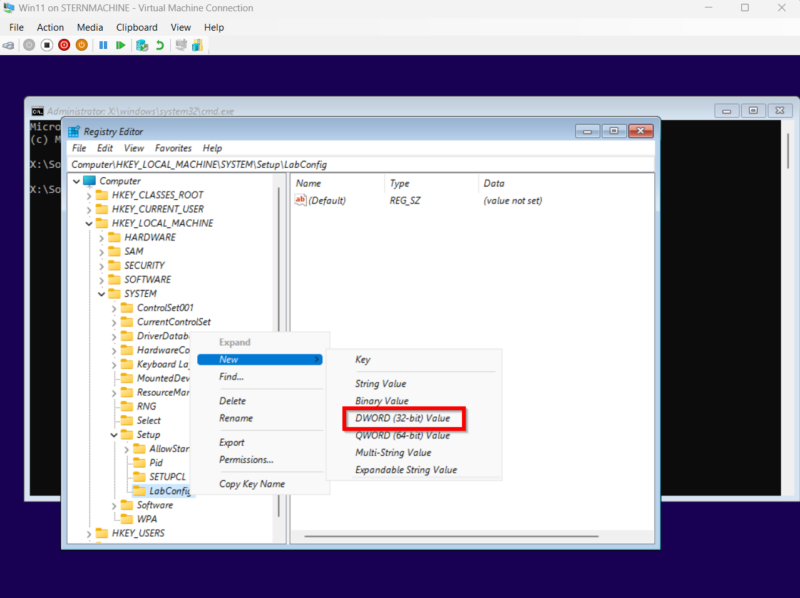
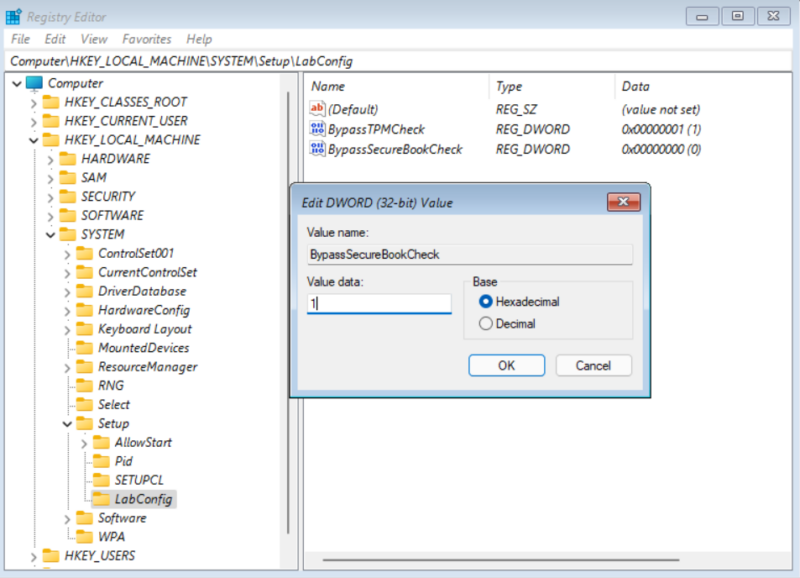
8. Select the new LabConfig key. In the right-hand pane, right-click, and select New > DWORD (32-bit) Value.
9. Create a value named BypassTPMCheck. Double-click it and set its value to 1.
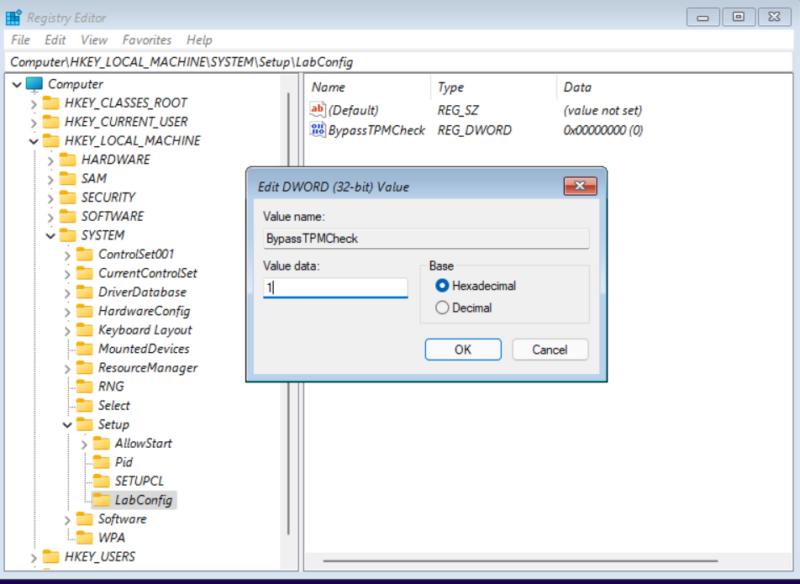
10. Create another DWORD value named BypassSecureBootCheck. Set its value to 1.
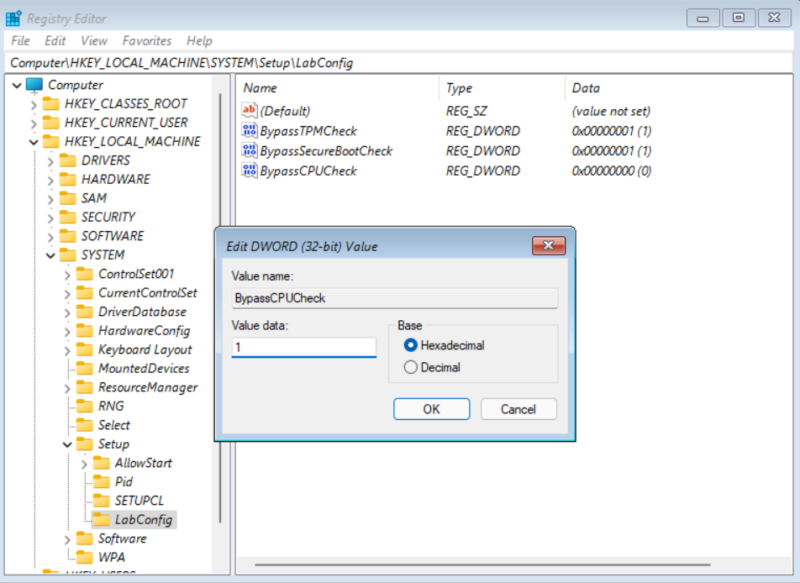
11. Create another DWORD value named BypassCPUCheck. Set its value to 1.
12. Close the Registry Editor and the command prompt. Click the back arrow in the top-left of the setup window.
13. Click Install now again. The installer should now proceed past the system checks. The remainder of our install will follow our Windows 10 install process.
14. Choose Custom: Install Windows only (advanced). Select the unallocated drive and click Next.
15. After standard installation steps, you will be asked to name your device. Name it Win11.
16. When asked how to join, select Set up for Work or School.
17. A Microsoft login screen will pop up. Choose the option below of Other sign in options.
18. Click on Domain Join Instead.
19. Now enter your temporary local user credentials to complete the login.
Connect to the Network and Join the Domain
Once you’ve logged in as the temporary local user, we need to connect the VM to our lab network.
- Shut down the Windows 11 VM.
- In Hyper-V Manager, go into the VM’s Settings and select Network Adapter.
- In the Virtual switch dropdown, select our intnet switch and click OK.
- Start the VM and log back in as the local user.
- The process to join the domain is identical to Windows 10. Go to System > Rename this PC (advanced), change the name to Win11 if you have not yet, and join the devop.local domain using the DEVOPdevopadmin credentials.
6. Restart the machine when prompted.
After the reboot, you can log in with your domain admin account (DEVOPdevopadmin) to verify that your Windows 11 workstation is now an active member of the lab.
Step 14: Adding a Windows Server 2025 Domain Controller
The last VM we will install in this default lab will be the most updated Windows Server 2025. This is the default server that will be used going forward in enterprise environments. What we will do is set up a second domain controller within our forest. After we set up this server, we will have the blueprint to add any amount of additional servers. The initialization doesn’t look so different from our Server 2022, but there are slightly different steps for adding it to our domain.
Get the Windows Server 2025 ISO
You can find the latest evaluation version of Server 2025 by searching for the “Windows Server Insider Preview”. This will lead you to the official Microsoft download page where you can get the ISO.
Create & Install the Server 2025 VM
This process is nearly identical to setting up our first server.
- In Hyper-V Manager, create a new Generation 2 VM named DC25.
- Memory: Assign at least 4096 MB (4 GBs).
- Processors: Assign at least 4 virtual processors.
- For Networking, connect it directly to our intnet switch.
- Create a virtual hard disk of at least 55 GB.

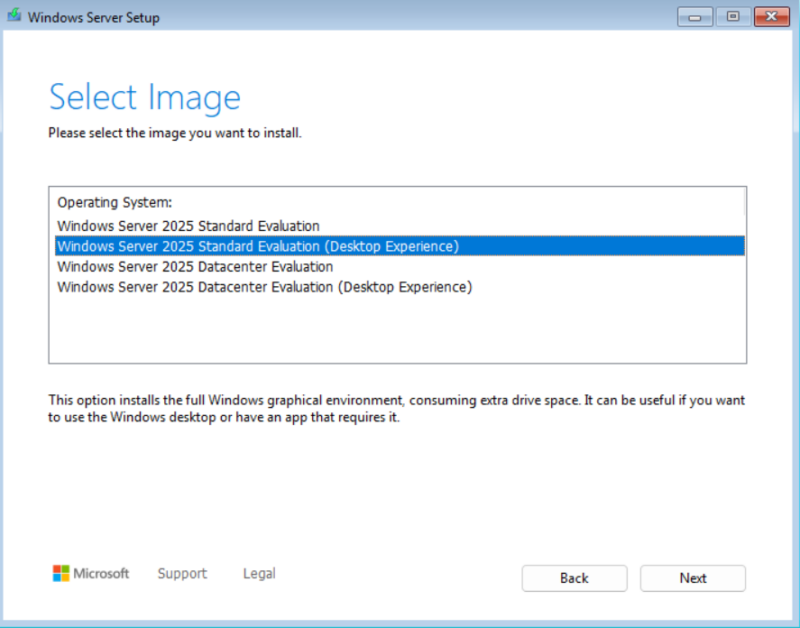
6. Install the OS from the ISO, selecting the Desktop Experience 2025 version and following all default setup steps. Create a password for the local Administrator account.
Initial Configuration
- Log in with the local Administrator account.
- This server should have already received an IP from our first DC’s DHCP service. However, since this will be a domain controller, it needs a static IP.
- Go to the network adapter settings and assign it a static IP address on our internal network, for example:
- IP address: 10.10.0.2
- Subnet mask: 255.255.255.0
- Default gateway: 10.10.0.1 (Our first DC is the router)
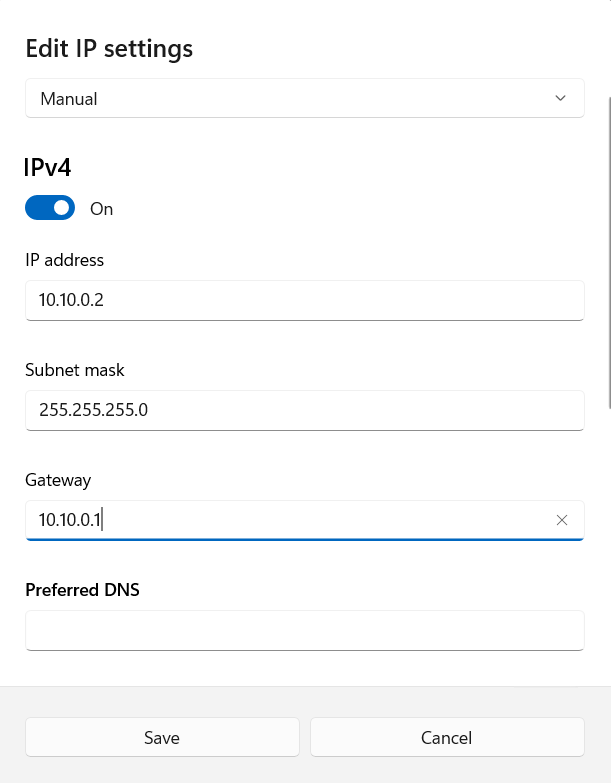
-
- Preferred DNS server: 10.10.0.1 (Point to the primary DC for DNS)
- Alternate DNS server: 127.0.0.1 (Point to itself)

4. Rename the server to DC25 and restart it.

Promote to a Domain Controller
This is where the process differs from setting up our first DC.
- After rebooting, log in as the Domain Administrator account we created.
- In Server Manager, go to Manage > Add Roles and Features and install the Active Directory Domain Services role.
- Once the installation is complete, click the notification flag and select Promote this server to a domain controller.

4. In the Deployment Configuration wizard, select the first option: Add a domain controller to an existing domain.

5. The domain DEVOP.local should be filled in. You will need to supply the credentials for our domain admin (DEVOPdevopadmin) to authorize this action.
6. Set your DSRM password and continue with all default options.
7. Under Specify Additional Replication Options, make sure Any Domain Controller is selected.

8. Proceed through the rest of the wizard, accepting the defaults for replication and file paths.
9. Ignore any prerequisite errors and proceed to install.
10. Click Install. The server will configure itself as a second DC for the DEVOP.local domain and then reboot automatically.
Your lab now has a redundant, multi-server Active Directory environment, which is much more representative of a real enterprise network.
Conclusion:
This is it! We are done and are ready to mess with a full enterprise network. Start to play around with user permissions, attack patterns, delegations, Kerberos ticketing, NTLM, SMB, anything you can think of. The best part of learning these attacks is learning the process of how they become vulnerable. In future blogs we will discuss adding common resources and features. Best of luck in your lab and let me know if you have any questions.