Introduction
Let’s face it, the security demands on SaaS platforms in 2024 are intense. You’re right in the thick of it, trying to ensure your application is as secure as possible. This guide is designed just for you, offering a detailed security checklist that spans secure development cycles and effective data protection. It’s packed with actionable advice to help you meet and exceed your SaaS platform’s security expectations, keeping you a step ahead of potential threats.
Security Checklist for SaaS Developers
Secure Development Lifecycle
When you’re pushing code to production, you might feel like security protocols are getting in the way. But incorporating security from the start isn’t just about ticking boxes—it’s about safeguarding your SaaS platform for the long haul.
As a developer, weaving security into the design and planning stages lets you spot potential threats early. This forward-thinking strategy makes your software safer and cuts down on the time and effort you’ll need to fix issues later on.
Security isn’t a one-time check; it’s an integral part of your development routine. Each phase gives you a chance to tighten defenses and make your application tougher to crack.
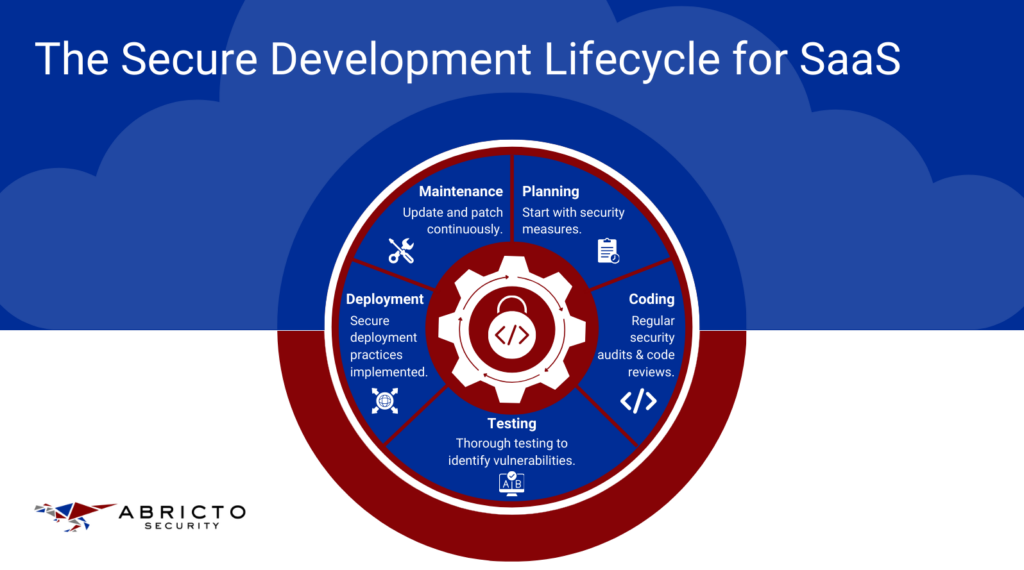
- Planning: Start by clearly defining your security goals. What must you protect? Who are your potential attackers? Set your strategies right from the start.
- Coding: Write code as if someone is always trying to break it. Use tools for static analysis to catch issues early on, and keep your peers involved with regular code reviews.
- Testing: Put your application through its paces. Beyond functional testing, include security-specific tests like penetration testing and use automated tools to scour for vulnerabilities.
- Deployment: Deploy with precision. Automate deployments to avoid manual errors and ensure configurations are consistently secure.
- Maintenance: Stay vigilant. Regularly update and patch your application to fend off emerging threats. Educate your team about new vulnerabilities and ensure everyone stays security-aware.
By weaving these practices into each phase, you turn security from a chore into a habit, making your application resilient and ready to stand up to threats.
If you’re just setting up security guidelines, starting with the OWASP Top 10 is a great move. It gives you a solid foundation in application security and helps address many of the security challenges you’ll face with your SaaS platform.
Data Protection and Privacy
When it comes to securing your app, protecting sensitive data is non-negotiable. You’re likely dealing with user information that could be a gold mine for hackers.
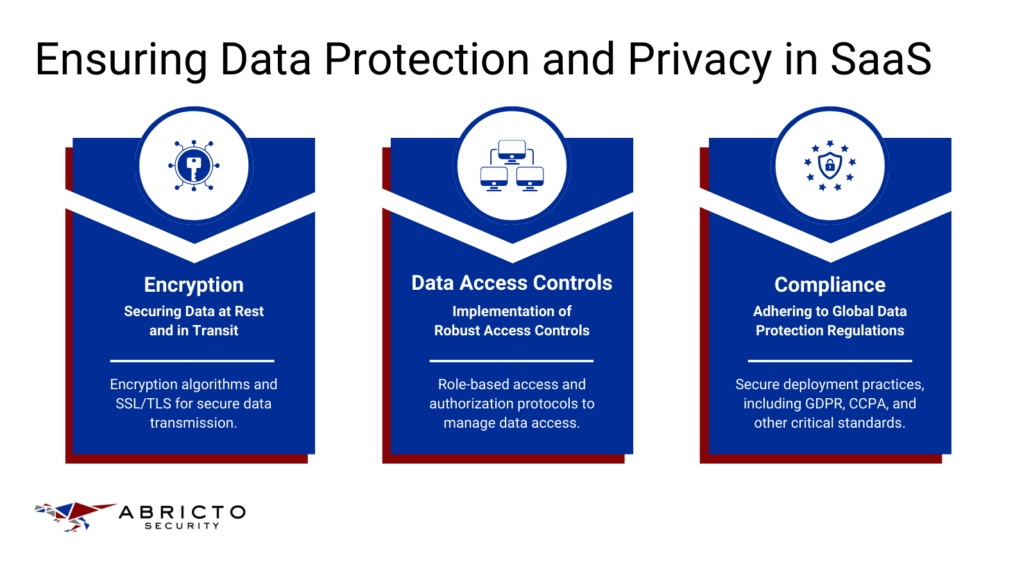
Using encryption for data at rest and in transit is like putting your data in a vault. Only the right key can unlock it, which keeps it safe even if someone breaks in.
Let’s go through some practical ways to implement encryption using scenarios you might actually encounter:
Node.js (Express Application) Example
Imagine you’re developing a user management system. Users input sensitive information that needs to be stored safely. Here’s a simple way to encrypt user data before it goes into your database, using the Node.js crypto module:
|
Here, every piece of sensitive data gets its own random initialization vector, making each encryption unique. This way, if a hacker gets their hands on your data, they can’t read it without the key, and even if they get one piece of data, they can’t use the same method to decrypt everything else.
Python (Flask Application) Example
Now let’s say you’re building a Flask app that needs to send sensitive data securely between services:
|
In this Flask example, your encryption includes a timestamp thanks to Fernet. This means that even if the encrypted data is intercepted, it won’t be useful forever—think of it as messages that self-destruct. This limits the time hackers have to work on cracking the encryption.
In both examples, encrypting your data makes sure that it remains secure and inaccessible to unauthorized eyes, helping you protect user information and comply with data protection laws. It’s a fundamental step that builds trust with your users and shields your application from potential threats.
Data Access Controls
In any SaaS platform, ensuring that only authorized personnel can access sensitive data is important for a few reasons. First, it helps protect your user’s data from internal threats, such as employees who might misuse their access privileges.
Second, it’s important for compliance with data protection regulations like GDPR or HIPAA, which require strict control over who can view or manipulate sensitive information.
The practical implementation of data access controls not only helps in managing the risk of data breaches but also streamlines operations. It allows you to clearly define roles within your software environment, reducing the complexity of managing permissions and minimizing the risk of human error.
Node.js (Express) Web Application Example
In a Node.js environment, handling roles and permissions can be straightforward yet effective. Here’s a practical way to implement role-based access control:
|
In this example, checkAccess is a simple function that verifies if the user has the required role to access specific endpoints. This method of checking roles before processing requests helps prevent unauthorized access effectively.
It’s practical because it centralizes your access control logic, making the system easier to manage and audit. Structuring it this way rather than embedding checks directly inside each route handler keeps your code clean and maintainable.
Python (Flask) Web Application Example
For Python applications using Flask, you can similarly implement a middleware approach for managing access:
|
This Flask example uses a decorator, require_role, which simplifies role verification across different routes. This approach is beneficial because it decouples authorization logic from your route handlers, enhancing code reusability and clarity. Using decorators makes your authorization system modular and easier to adapt as your application scales up.
Implementing structured access controls like these not only secures your SaaS platform but also aligns with best practices that protect your company and your customers. While it may seem like additional effort during development, it pays off by minimizing potential security risks and liability in the long run.
Compliance
As a developer, you’re probably more excited about pushing the next big feature than poring over compliance documents. After all, sifting through dense regulatory texts like those for the General Data Protection Regulation (GDPR) and the California Consumer Privacy Act (CCPA) can feel like a massive distraction from the real work of coding. It’s frustrating when what you really want to do is solve technical challenges, not legal puzzles.
Yet, here’s the thing: understanding these regulations is crucial, especially for SaaS platforms that operate across borders. These aren’t just bureaucratic hoops to jump through.
They’re about safeguarding user data and building trust. In practical terms, GDPR demands that if your users are in Europe, their data needs to be handled with extreme care—you need to ensure it can be accessed, corrected, or deleted at the user’s request.
Under CCPA, if your users are in California, you have to inform them about what personal data you collect and why.
Getting a handle on these rules can actually serve as a guide for better software architecture. Think of it as designing with a safety net. Integrating privacy from the start isn’t just about compliance; it’s about making your application robust, secure, and trustworthy.
So, while it might seem like a chore, getting familiar with these legal frameworks can profoundly influence how you design your systems. It ensures you’re not just building features, but creating a secure environment where user data is respected and protected.
Authentication and Access Control

As you develop SaaS applications, it’s essential to bake security into your design from the start. Managing security can be daunting—especially with the pressure to deliver features quickly—but incorporating strong authentication and precise access controls not only protects your application but also reinforces trust with your users. Let’s explore practical, actionable ways to implement these concepts in your projects.
1. OAuth for Secure Third-Party Authentication
Using OAuth in your SaaS app allows users to authenticate with third-party services without compromising their security. This is especially useful if your app needs to interact with other platforms like Google or Facebook. By using OAuth, you delegate the authentication process to providers who specialize in security, which can significantly reduce the risk of security breaches.
Here’s a practical implementation using OAuth in a Node.js application with the passport-google-oauth20 strategy for logging in users through Google:
|
In this example, the OAuth process is managed securely, and you offload the responsibility of managing sensitive credentials, which can ease your security burden and simplify the user login experience.
2. Role-Based Access Control (RBAC)
Implementing RBAC is about ensuring that users only have access to the resources that are necessary for their roles. This is critical in preventing data leaks and ensuring that users don’t accidentally or maliciously alter sensitive information.
Here’s how you might set up RBAC in a Python Flask application:
|
In this Flask setup, flask_principal is used to manage user identities and roles. The admin_permission object is a permission that only allows users with the ‘admin’ role to access certain endpoints. This kind of granular control is crucial for maintaining the integrity and confidentiality of your data.
3. SAML for Enterprise Single Sign-On (SSO)
SAML (Security Assertion Markup Language) is often used in enterprise environments to enable single sign-on (SSO), making it easier and more secure for users to access multiple systems with a single set of credentials. Implementing SAML can seem complex, but it greatly enhances security by centralizing authentication and reducing the number of attack vectors associated with multiple login systems.
Here’s a basic example of how you might implement SAML in a SaaS platform using Python with the python3-saml library. This setup is particularly useful for enterprise applications where users need to access multiple tools and services seamlessly:
|
This code sets up SAML authentication flows, where the SSO process starts at the /sso endpoint and the assertion consumer service (ACS) endpoint is /acs. It handles both the redirection to the SAML identity provider and the processing of assertions received in the response.
4. Multi-Factor Authentication (MFA)
MFA adds an essential layer of security by requiring multiple forms of verification. This means an attacker needs more than just the user’s password to gain access, significantly increasing your app’s defense against unauthorized access.
For example, integrating MFA in a Node.js application can be achieved using libraries like speakeasy. This library can generate one-time tokens which users can verify using their mobile devices:
|
This snippet demonstrates generating and verifying a time-based one-time password (TOTP). Users can generate these tokens using an app like Google Authenticator. Requiring this additional step makes it much harder for unauthorized users to gain access, even if they’ve compromised other credentials.
These additional security measures—SAML for streamlined access across multiple services, and MFA to ensure that even if passwords are compromised, your application’s data remains protected—are invaluable for enhancing your SaaS platform’s security posture.
Using AppSec As A Service (ASaaS)
Throughout this discussion, we’ve explored how secure development cycles, encryption, and authentication strategies are fundamental to protecting your SaaS platform. However, keeping up with these security demands, especially compliance with evolving standards, can quickly become overwhelming. That’s where AppSec as a Service can really make a difference. It’s like having an expert team dedicated to untangling the complex web of security requirements for you. This means you can spend less time worrying about security protocols and more time doing what you love—building awesome software. If simplifying your security efforts sounds good, book a consultation with us today.